
Using the DTX 12 (Get yours here!) *affiliate link* with Ableton Live is easy to set up. You can change the kits on your Yamaha M12 automatically to the songs you play in Ableton Live via the DTX M12 Kit Selector from AbletonDrummer.com. For this you would need Max for Live, which is included in Ableton Lives Suite version or can be bought as an add on towards Ableton Live STANDARD.
You can get the Max for Live device here: https://gumroad.com/l/dtxm12kitselector

Check out a run-through on how to use the device made by Sebastian Beresford who is the author of “The Art of eDrumming”.
How to set up the Yamaha DTX with Ableton Live
Connection between computer and DTX M12
First you will need to establish a MIDI connection FROM your computer/Mac TO your Yamaha DTX M12 pad. You can do this via USB or via a MIDI.
Connecting Yamaha DTX Multipad 12 via USB:
You will need to install the Yamaha USB MIDI driver for your operating system. You will find the available drivers here:
-MAC: https://usa.yamaha.com/support/updates/usb_midi_driver_for_mac.html
-Win (64bit): https://de.yamaha.com/de/support/updates/umd_win64_kbd.html
After installing the driver you will just need to connect your M12 via a USB cable with your computer/Mac.
Connecting your DTX M-12 via MIDI to Ableton Live:
If you already have some external hardware connected to your computer/Mac which has a MIDI OUT 5-Pin socket (e.g. an external sound card) – just use a standard MIDI cable to connect the 5-PIN MIDI IN from your M12 to your MIDI OUT of your external sound card.
MIDI Preferences of DTX-M12
You will now need to set the MIDI In/Out preferences of your Yamaha M12 to USB (USB connection) or MIDI (MIDI 5-pin socket). You can check this in the Yamaha dtx-12 manual HERE or check out a video tutorial on how to do this HERE.
NOTE: This MIDI connection described here is only to send KIT CHANGES from within Ableton Live TO your Yamaha M12 – if you want to be able to use your Yamaha M12 as an external MIDI controller (e.g. triggering notes n Ableton Live via your M12) you will need to make a MIDI connection FROM your M12 MIDI OUT – TO your ext. sound card MIDI IN.
Ableton Live MIDI preferences
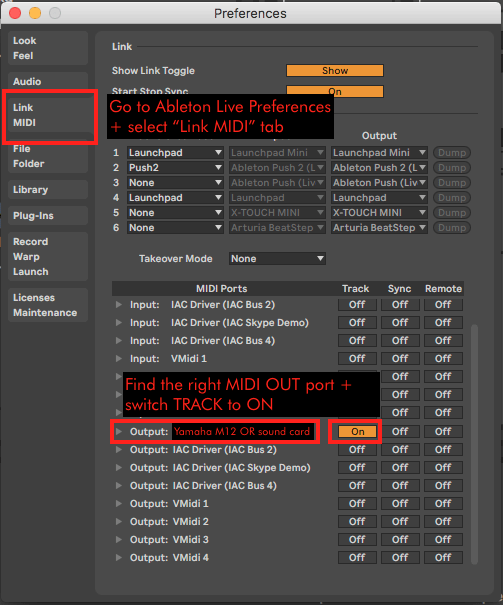
Once you have an external MIDI connection established, you need to make sure that you have switched on the TRACK OUT of your dedicated MIDI PORT in Ableton Lives MIDI preferences.
MIDI OUT routing from Ableton TO Yamaha DTX M 12
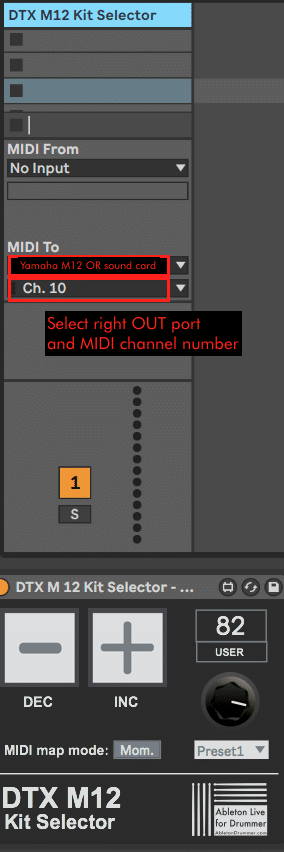
In Ableton Live create a MIDI track and put the “DTX M12 Kit Selector” on this track. Set the “MIDI To” of this track to the right MIDI port.
This will be the same name like you just activated in the MIDI prefs. Set the “MIDI To” channel to channel number “10” – this is the default set channel used by your Yamaha DTX M12.
By clicking on the “DEC/INC” buttons on Max for Live device in Ableton Live, you can test if your Yamaha M12 is already receiving those commands and is changing kits.
If this is not working already:
Adjust the kit change / Program Change Receive preferences inside your Yamaha M12
Depending on your the preferences set in your Yamaha M12 kit changes may change sounds or patterns or both. Per (factory) default the Yamaha M12 is set to receive Program Changes and the receive those on channel number 10. You can check if this is the case in your M12 preferences under your “PROGRAM CHANGE RECEIVE PAGE” – This is all very well explained in the Yamaha DTX-M12 manual on page 90 (click to view!)
Set the PROGRAM CHANGE RECEIVE to ON.
Want to dive deeper into Ableton Live for drummers? Click HERE to find out more!
How to use the DTX M 12 Kit Selector:
Stepping kits up/down via the DEC/INC buttons
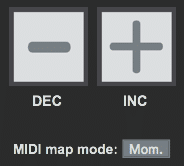
You can click with your mouse on those buttons to increase and decrease the kits on your Yamaha M12. As another option you can as well MIDI MAP or KEY MAP those buttons – this could be by other external MIDI hardware or via your computer keyboard. You need to go into the MIDI MAP MODE/KEY MAP MODE and map the dedicated button/wheel/key to the DEC/INC buttons.
Depending on the messages of your external MIDI controller is sending you might want to switch the “MIDI map mode” for those buttons on the device. Ableton Live MIDI MAP MODE only reacts to NOTE ON messages, so if you are sending MIDI NOTES switch the mode to “Mom.” (momentary). The same applies for using computer keyboard keys.
If you are using MIDI CC messages your controller might send 2 values (one for press and one for release) which might cause the DEC/INC buttons to be ‘pressed’ twice. In this case change the MIDI map mode to “Toggle”.
Changing kits via the kits wheel
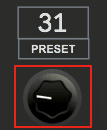
You can use the dial to change the kits as well. Via mouse click (hold down) + moving your mouse up and down you can move this dial up and down as well.You can as well MIDI map this wheel to external MIDI control.
Changing kits via the kit menu on the DTX M12
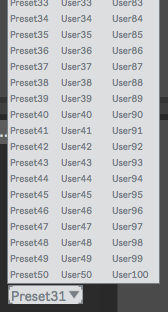
Another option to change kits would be to use the kit menu. Once you click on the menu all 50 preset kits and 100 user kits are showing up to be selected. This way you can access every kit directly with one mouse (well actually two…) mouse clicks.
Automated kit changes
If you are using your Yamaha DTX Multipad 12 along with other clips being triggered in Ableton Live you can as well set up automated kit changes via dummy clips in Ableton Live.
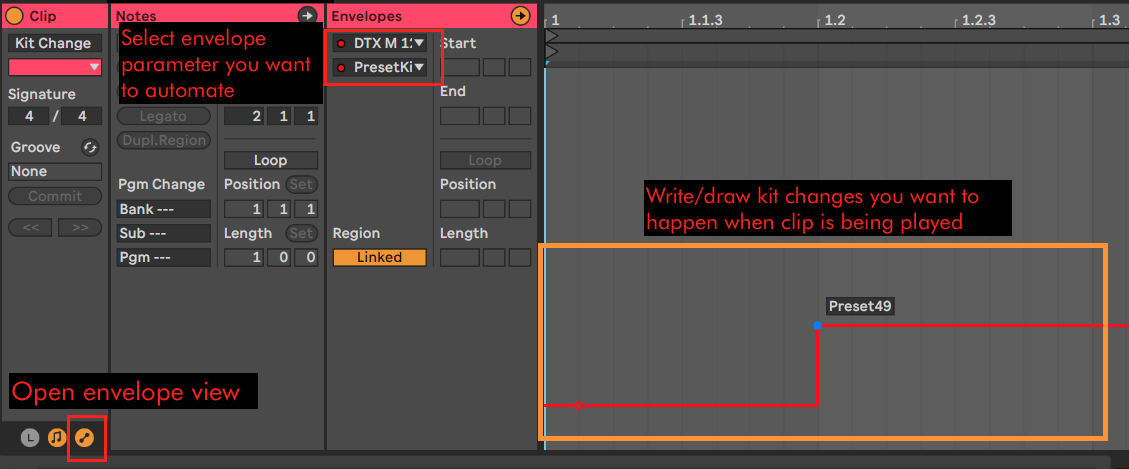
You can access 3 parameters of the Max for Live Kit changer via envelopes (Session View) and/or automation (Arrangement View) in Ableton Live:
-PresetKit
-PKit Up
-PKit Down
Just create an empty MIDI clip and open up the envelope view. Select the parameter you want to automate (e.g. PresetKit) and set a dot/write an envelope for the kits you want to change when this clip is being triggered or a change later in the clip.
Please check out my other Max for Live devices (not only) for drummers, my online courses, teaching services and other here: http://www.abletondrummer.com
If you like what I do, you can find some options to send some love beck here!
Please check out Sebastians (aka B.I.D.) video run-through on how to use this device: