
Advanced drumbeam expression in Ableton opens up once you connect one thing the drumbeam already does — sending a MIDI CC value based on where your stick lands — to something Ableton Live already supports: MPE Slide. This article walks you through exactly how to make that connection using the Electronic Drum Position to MPE Slide M4L PACK, so that hitting the same pad in different positions changes the sound in real time, per note, with no knob required.
What Is MPE Slide and Why Does It Matter for Drummers?
Before diving into the setup, it helps to understand what you are actually connecting to. MPE stands for MIDI Polyphonic Expression. It is a protocol that Ableton Live has natively supported since Live 11, and it allows individual notes to carry their own expression data independently of each other.
One of the MPE dimensions is Slide — transmitted internally as CC 74. On a controller like the Push 3, Slide corresponds to the vertical position of your finger on a pad. Ableton’s built-in instruments — Drift, Sampler, Drum Sampler, Wavetable, Analog, and Meld among them — all include slide as a modulatable parameter. Many presets in the stock Ableton library already have slide mapped to something useful, such as filter frequency, LFO rate, or pitch modulation.
In other words, the infrastructure is already there. The missing piece for drum controllers is the bridge between the CC value your pad sends and the MPE Slide value Ableton expects.
How the drumbeam Sends Position Data
The drumbeam sends a MIDI CC value for each zone depending on where the stick lands within that zone. The CC number is configurable per zone in the drumbeam’s browser-based editor. This means you can assign a unique CC number to each pad zone — and the Electronic Drum Position to MPE Slide M4L PACK picks those up and converts them to MPE Slide data that Ableton’s instruments can act on directly.
Other controllers work here too. The Bop Pad, for example, also sends a CC value based on strike position. The workflow is the same regardless of which controller you use.
Setting Up Advanced drumbeam Expression in Ableton: Step by Step
Step 1: Route Your drumbeam Into Ableton Live
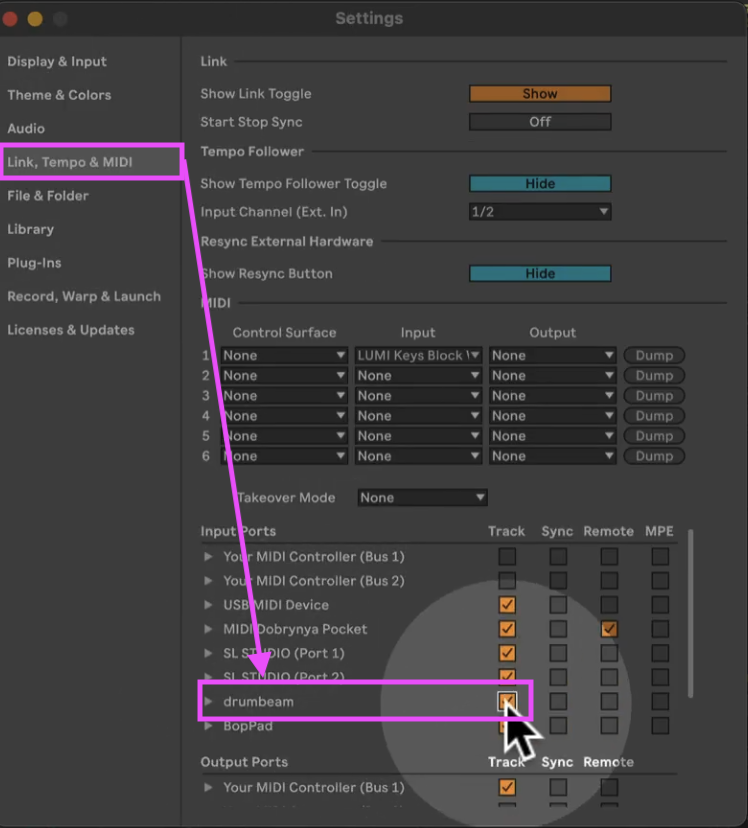
First, open Ableton’s settings under Link, Tempo & MIDI and make sure your drumbeam appears as a MIDI input with Track switched on. This routes the drumbeam’s MIDI output into your Live set so any MIDI track can receive it.
Step 2: Create a MIDI Track and Load the Device
Next, create a MIDI track and set its MIDI input to your drumbeam. Then load the appropriate device from the Electronic Drum Position to MPE Slide M4L PACK onto that track.
The pack includes three devices, and choosing the right one depends on how you are playing:
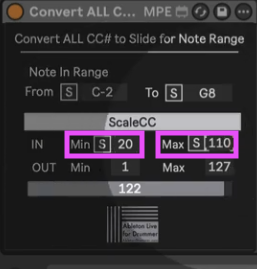
- Convert All CCs to Slide for Note Range — use this for monophonic playing. It listens to all incoming CC numbers from your controller (except CC74) within a set note range and converts them to MPE Slide. This device requires the least setup and works well for single-note lines or drum sounds.
- Implement CC Slide MPE (8 notes) — use this for polyphonic playing with up to 8 simultaneous notes.
- Implement CC Slide MPE (15 notes) — use this for polyphonic playing with up to 15 simultaneous notes.
For most starting points, begin with the note range device. It excludes CC 74 automatically — since that is the internal CC number Ableton uses for slide — so you do not need to worry about any conflicts.
Step 3: Map Notes and CC Values
With the Convert All CCs to Slide for Note Range M4L device loaded all notes and CC messages will already work. If you want to set this to work for single pads only you can change the Note Range From – To values to to notes you want to be effected. You can quickly set this
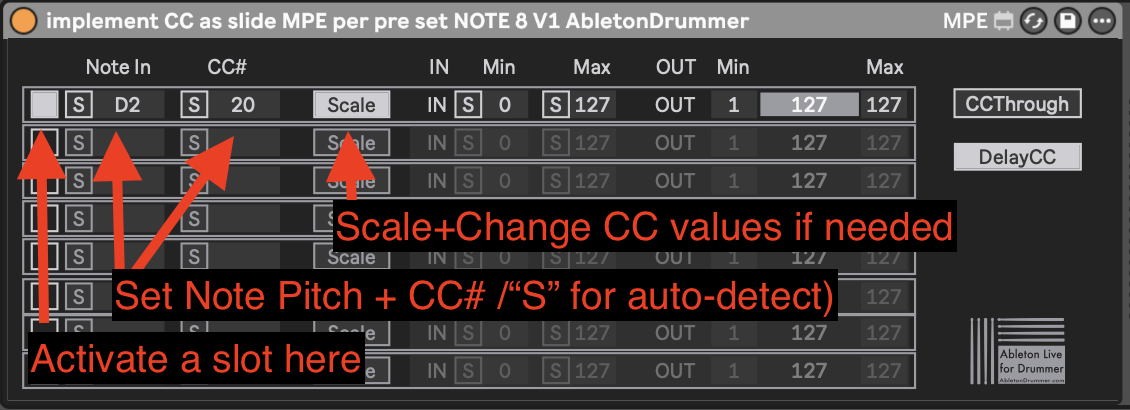
With the activate Implement CC Slide MPE M4L device you need to set the notes and CC messages you want it to be applied to individually. As this device(s) are working in polyphonic mode you would need a different CC number to be applied for every note pitch. You can just activate a slot on the device via the On/Off toggle button. Then create a mapping via mouse click on S to enter sync mode. Strike the drumbeam pad you want to assign — the device detects the note. Then do the same for the “CC#” section in the same slot to auto-detect what CC# the particular Drumbeam pad zone is sending. Repeat this for each zone you want to include.
If you are using the drumbeam, the download that comes with the pack includes a ready-made drumbeam preset which you can load on your Drumbeam. It as well includes an Ableton Live Project where this will work out of the box. This way you can skip this step entirely and go straight to playing.
Step 4: Add a Note Length Device
Because drum controllers send a note-off message immediately after the hit, some of the Ableton instruments sounds will be too short (to express any slide movement). Consequently, add a Note Length device before your conversion device in the chain. Set the length to whatever suits the sound — a quarter note or longer works well as a starting point. One cool effect would be to trigger chords via the Advanced Expressive Chords device. So a possible effect chain like on the picture below. This effect chain is included in the full pack download.
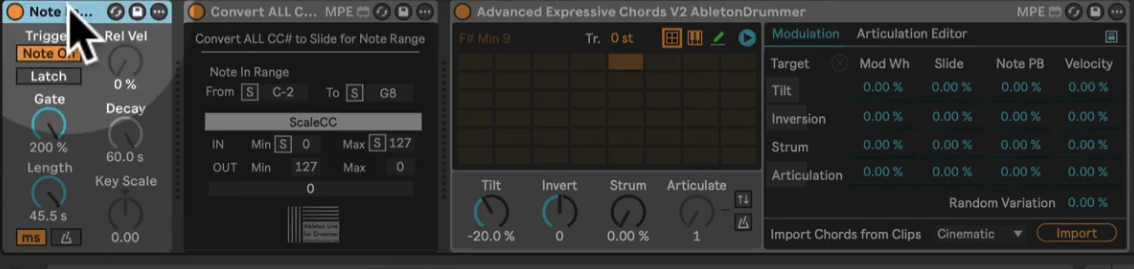
Note Length → Convert All CCs to Slide (or Implement CC Slide MPE) → Advanved Expressive Chords (optional) → Instrument
Step 5: Scale the CC Range to Your Playing
The drumbeam sends values from 0 to 127 across the full width of a zone. However, in live performance you rarely hit the absolute edges of a zone consistently. To compensate, the device lets you set a custom input range — for example, 20 to 110 — so that even a moderately low hit outputs the minimum value and a moderately high hit outputs the maximum. You can autodetect this range by playing naturally and letting the device record your actual min and max, or set it manually.
Loading an Instrument and Activating Slide
Once your signal chain is set up, drag any MPE-capable instrument or preset from the Ableton Live library onto the same track. Several instruments work particularly well:
- Drift — includes slide as a built-in modulation source with dedicated percentage control
- Sampler — exposes slide under its MIDI tab, mappable to filter frequency and other targets
- Drum Sampler — includes a slide section in the Global area; set the modulation destination to Filter, Attack, Decay, or an FX parameter
- Wavetable — maps slide to filter frequency and LFO rate directly from the MPE section
- Analog — includes an MPE section with slide routing to up to two destinations
For drum sounds specifically, open the Drum Sampler on a pad, scroll to the Global section, and switch the modulation to Slide. Then select a destination — Filter is the most immediate — and set an amount. From that point forward, hitting closer to the edge of the zone produces a noticeably different sound than hitting the center.
Polyphonic Expression: Per-Note Slide Control
Here is where advanced drumbeam expression in Ableton becomes genuinely powerful. When you switch to one of the polyphonic devices — Implement CC Slide MPE — each note in a chord carries its own independent slide value.
This means that in a three-note chord, one note can have its filter fully open, another partially open, and a third closed — all simultaneously, all controlled by where your stick lands on each respective pad zone. You can change any individual note’s expression mid-chord without affecting the others.
To hear this clearly, use and slow an arpeggiator tempo down and play two or three notes at once. As you shift your playing position on each zone, you will hear each voice change independently. That is what advanced drumbeam expression in Ableton delivers that standard MIDI CC mapping simply cannot.
What About Native MIDI Mapping?
You can map CC values to parameters directly using Ableton’s native MIDI Map mode, and it does work. However, there are two limitations worth knowing about. First, MIDI mappings in Ableton are set-specific — they apply only to the Live set you create them in and do not carry over to other sets. (One solution to overcome this would be my Global MIDI MAP M4L devices.) Second, native mapping is monophonic at the channel level, meaning it cannot deliver per-note expression the way MPE does.
Requirements
To run advanced drumbeam expression in Ableton as described here, you will need the following.
- Ableton Live 12 (Suite, or Standard with Max for Live add-on)
- Max for Live — included in Live Suite
- A drum controller that sends MIDI CC positional data (drumbeam, Bop Pad, or similar)
Most of the pack’s features also run in Live 11, but full compatibility and support is guaranteed for Live 12 and above. Do not miss the full video tutorial below.
Get the Electronic Drum Position to MPE Slide M4L PACK
The Electronic Drum Position to MPE Slide M4L PACK includes all three conversion devices, and a ready-to-play Ableton Live set with pre-configured drumbeam presets and a selection of MPE-mapped instruments from the stock library.


