
MIDI mapping in Ableton Live is an essential skill. While the native MIDI mapping feature offers a solid foundation, preserving and recalling global MIDI mapping presets across various projects can be a daunting task. In this guide, we’ll provide practical solutions, spotlighting the ‘Global MIDI Map’ plugins for Ableton Live. This tool is not just an enhancement; it’s a game-changer for those seeking workflow improvements via saving MIDI mappings in Ableton Live. We’ll explore how this plugin seamlessly integrates with both Audio and MIDI Effect Racks, delivering a solution on saving MIDI Map control presets for your MIDI controller across Ableton Live sets.

Decoding the Basics of MIDI Mapping in Ableton Live:
Before we delve into the ‘Global MIDI Map’ plugins, let’s reacquaint ourselves with the fundamentals of MIDI mapping within the context of Ableton Live.
MIDI Mapping Essentials in Ableton Live
MIDI mapping acts as the language allowing your hardware MIDI controllers to communicate with Ableton Live’s parameters. You can quickly MAP a dial, fader or button of your MIDI controller. Just click “MIDI” on the top right corner in Ableton Live to activate the MIDI MAP Mode. Just select a parameter and then move a dial/fader or press a button on your MIDI controller to set up a MIDI mapping.
Confronting Native MIDI Mapping Challenges:
While Ableton Live’s native MIDI mapping is user-friendly, the challenge lies in preserving mappings across projects. This sets the stage for the need for a Max for Live solution like the Global MIDI MAP devices.
UNFORTUNATELY ABLETON LIVE’s NATIVE MIDI MAPPING IS NOT GLOBAL. YOU CAN’T IMPORT MIDI MAPPINGS INTO OTHER ABLETON LIVE SETS. TO SOLVE THIS GAP YOU CAN USE THIS MAX FOR LIVE DEVICES TO SET UP GLOBAL MIDI MAPPINGS IN ABLETON LIVE!
Setting up global MIDI control presets for Ableton Live
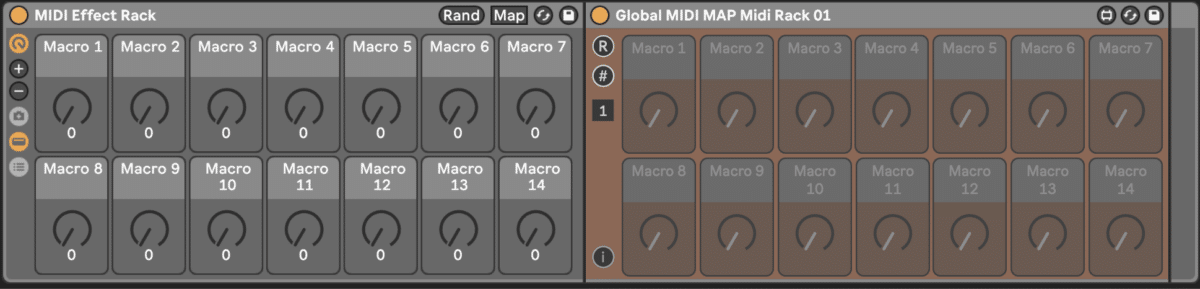
You can create and set up global MIDI mappings inside of Racks. This will work for Macros of Instrument racks, MIDI Effect Racks and Audio Effect Racks. The MIDI CC from your MIDI controller needs to be routes into a MIDI track. Here it will be received via the “Forward to Global MIDI” Max for Live device. This device sends the MIDI CC messages from your controller to the “Global MIDI Map” devices which need to be placed inside an effect rack in Ableton Live. Let’s go through how to set global MIDI presets step-by-step:
Direct MIDI Input MIDI Mapping:
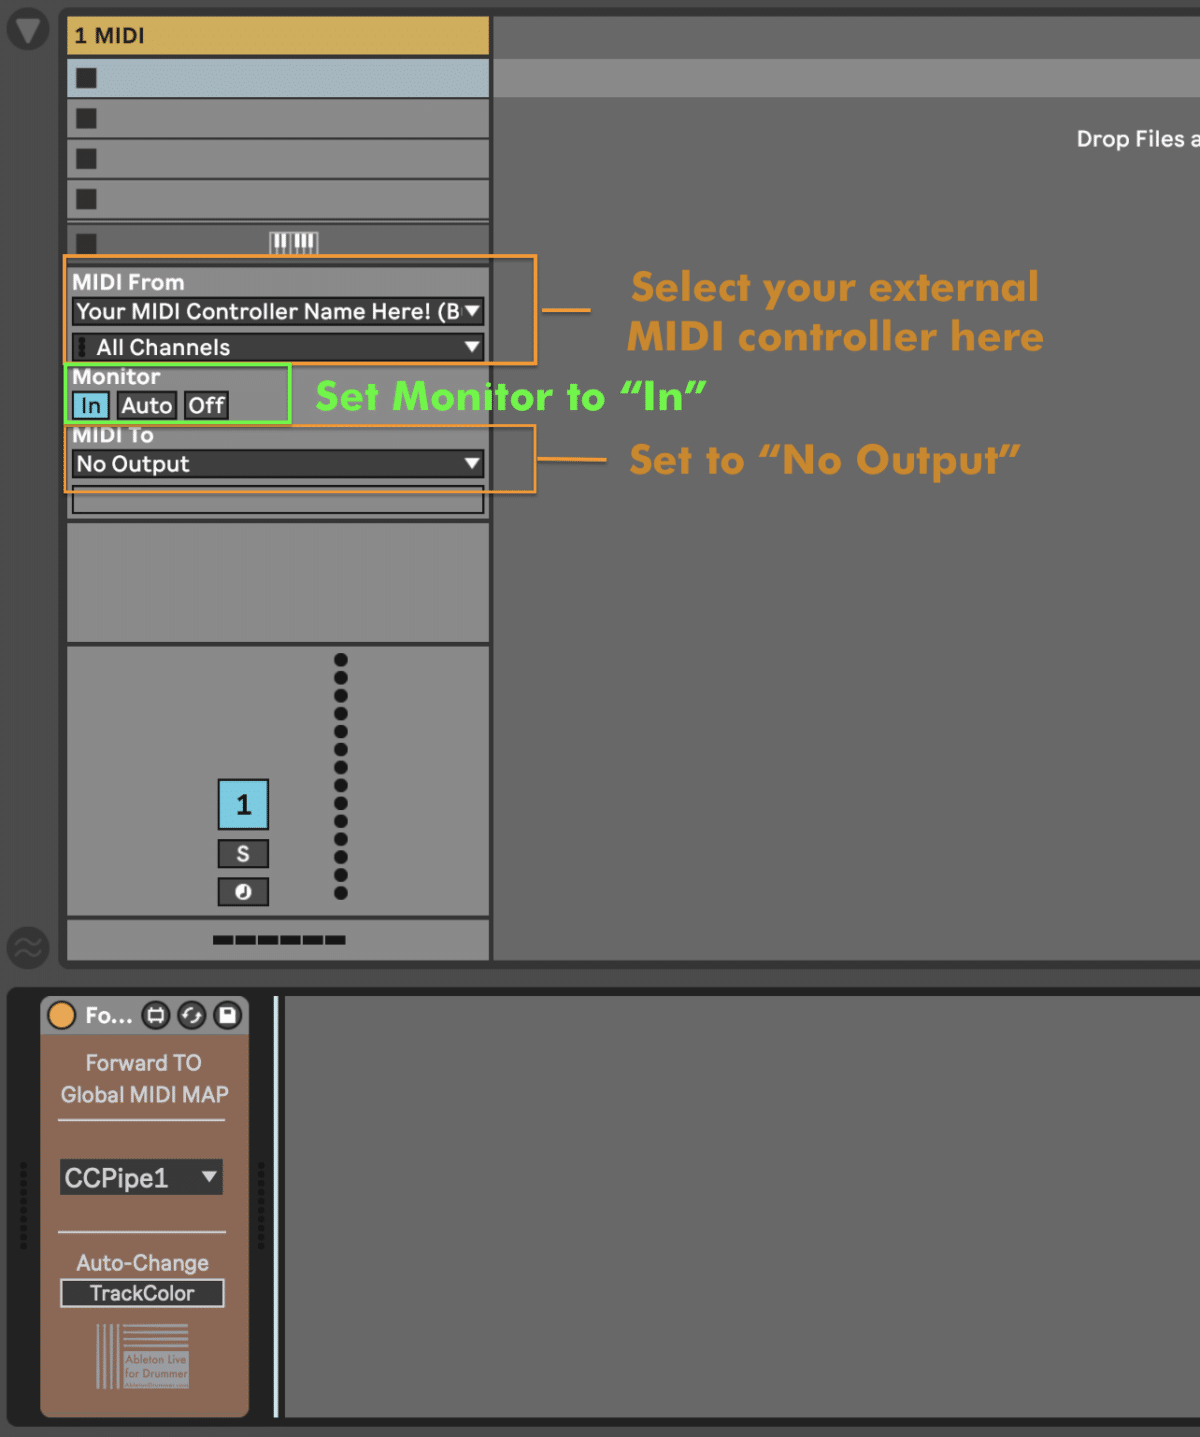
Create a MIDI track and place the “Forward to Global MIDI” Max for Live device. Set the “Midi From” on this track to receive MIDI messages from your MIDI controller. Make sure to select the “Monitor” to “In”. This way MIDI is always being passed through on this MIDI track. It is important to keep MIDI routings clean as possible to avoid MIDI messages going to tracks they shouldn’t. You can set the “Monitor To” to “No Output” to have MIDI routings being set up as most accurate.
Create ‘Global MIDI Map’ Presets for persistent MIDI control in Ableton Live
You get a MIDI and an Audio Version of the MIDI Control Max for Live device.
You need to set up the MIDI version for MIDI Effect Racks and the Audio version for Audio Effect Racks.
First open one “Global MIDI Map” device on a track in Ableton Live and “Group” it. You are able to group any device in Ableton Live via right-click on the top bar and selecting “Group” from the appearing menu. There are short cuts available for grouping a device in Ableton Live: “CMND” + “G” on a Mac and “CTRL” + “G” on a windows computer.
How to set up a global MIDI control preset to a Rack in Ableton Live
- Click on “R” which stands for “Refresh”. This will bind the Max for Live device to the MIDI or Audio Effect Rack
- The device is now bind to the Ableton Rack it is nested in. Changing the number of Macros in the Ableton Rack will automatically be reflected in the Max for Live device.
- When you change names of the Macro Dials of the Ableton Effect Rack just click “R”/”Refresh” once to update the names on the MIDI Preset M4L device.
Set global MIDI CC in for MIDI Controller in Ableton Live:
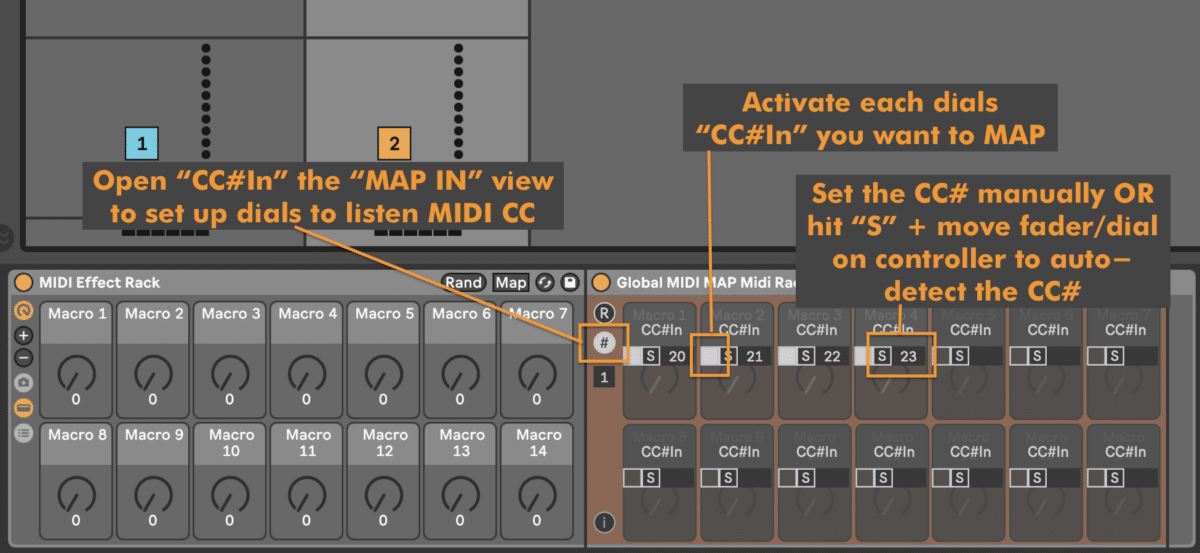
You now need to tell the Max for Live device which continuous control numbers your MIDI controller is sending the values. The M4L device can detect the MIDI CC numbers automatically.
Important: Remember that your controller first sends into the first MIDI track. The “Forward To” device forwards the MIDI messages to the ” Global MIDI MAP” (receiver) devices.
- Open the “CC#In” view via click on the “#” button. You will find the “#” button on the left.
- Activate each “CC#In” toggle button inside a dials slot you want to use for a MIDI control mapping.
- You are now able to set the Continuous Control number for each macro dial in the number box of each dial cell. The quickest way would be detect the message automatically by click on “S” (= sync) and then move the fader or dial on your MIDI controller.
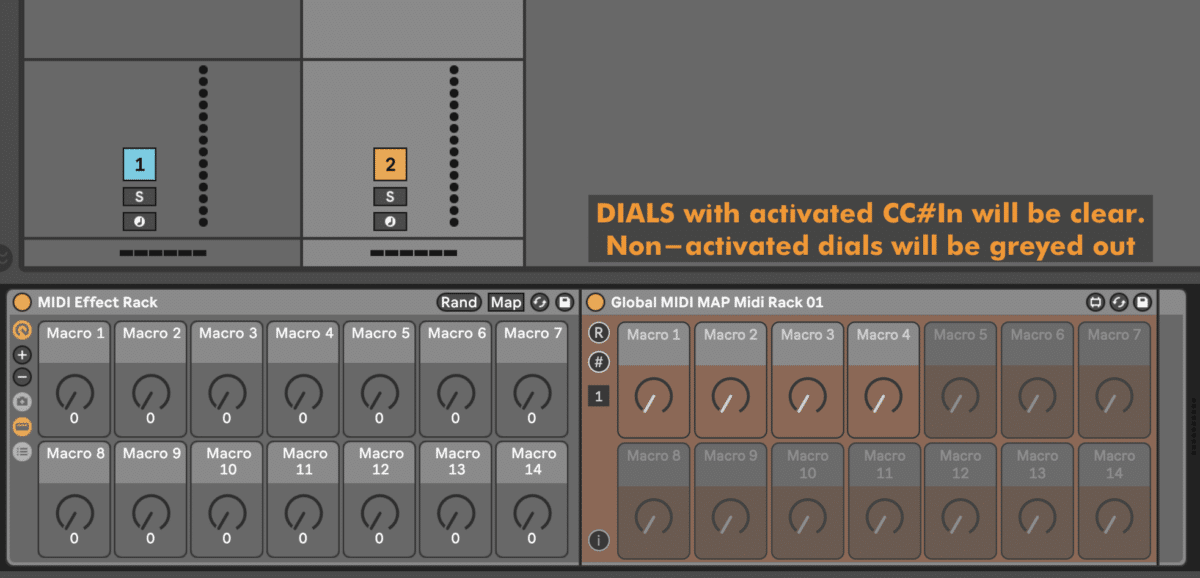
When you click on “#” you will leave the “CC#In” view and you can now easily see which macro dials are active and set up to listen to MIDI CC messages. Active dials look active and present. Non-Active dials are greyed out.
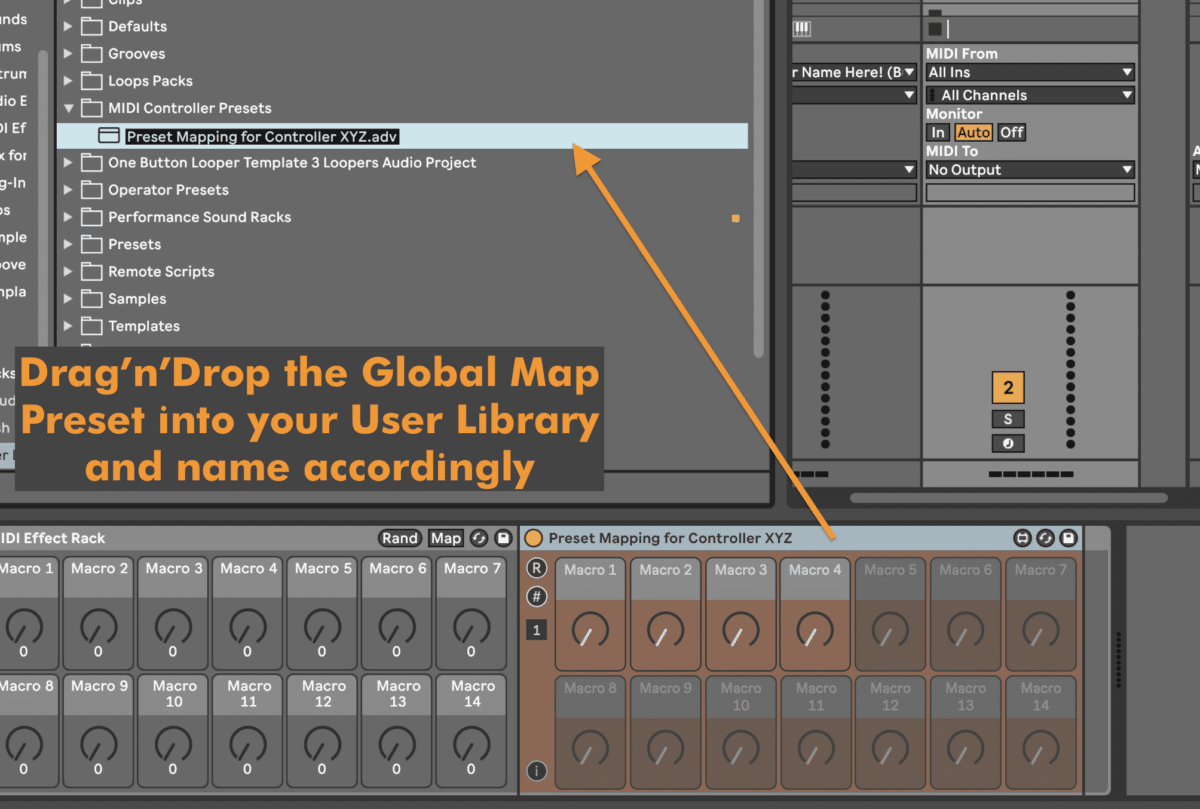
Save and Recall MIDI MAP presets via your User Library in Ableton Live
You have now set up a MIDI control which you can use across Ableton Live sets. Just store and name presets in your User Library via dragging the M4L device there.
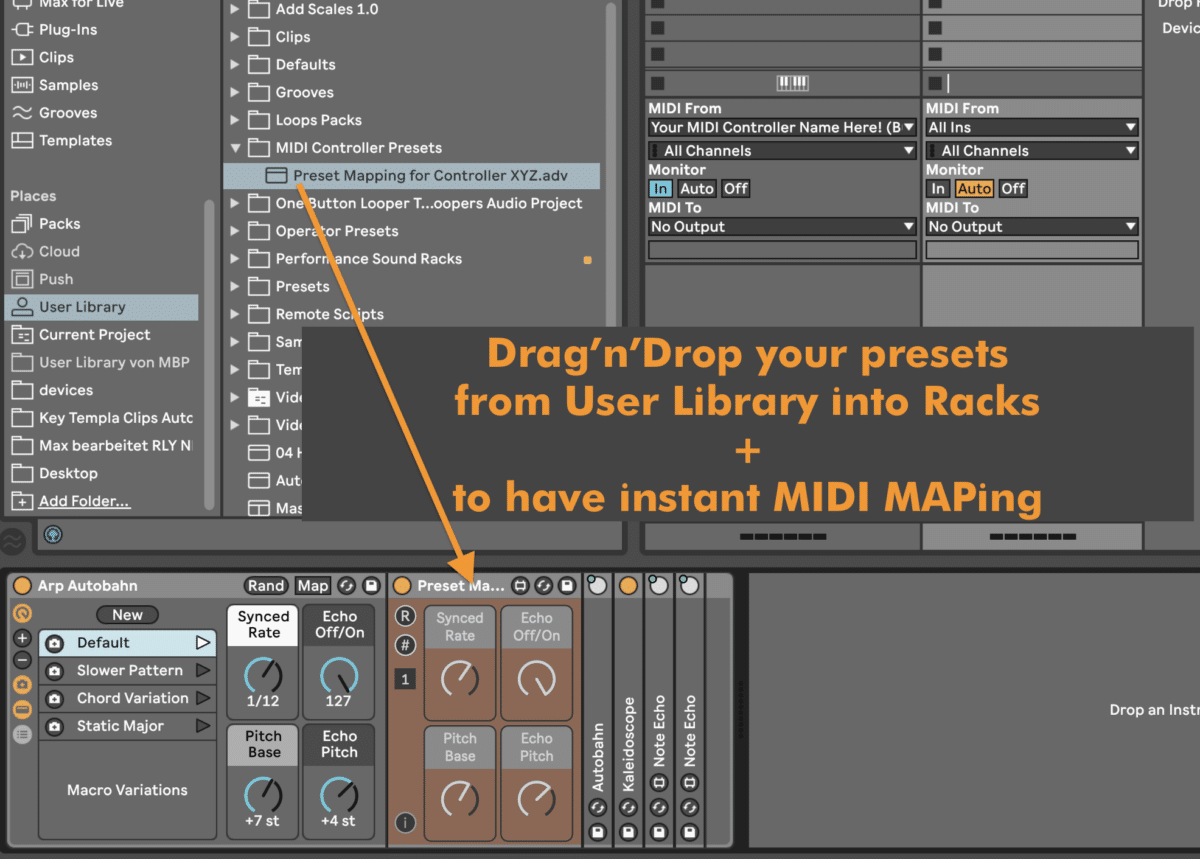
When you want to recall and apply a MIDI control preset you can now just drag and drop it FROM your User Library INTO every Ableton Live Rack. Remember that the MIDI presets will work for MIDI Effect Racks and the AUDIO for Audio Effect Racks.
Advanced Features of Global MIDI Map in Ableton Live:
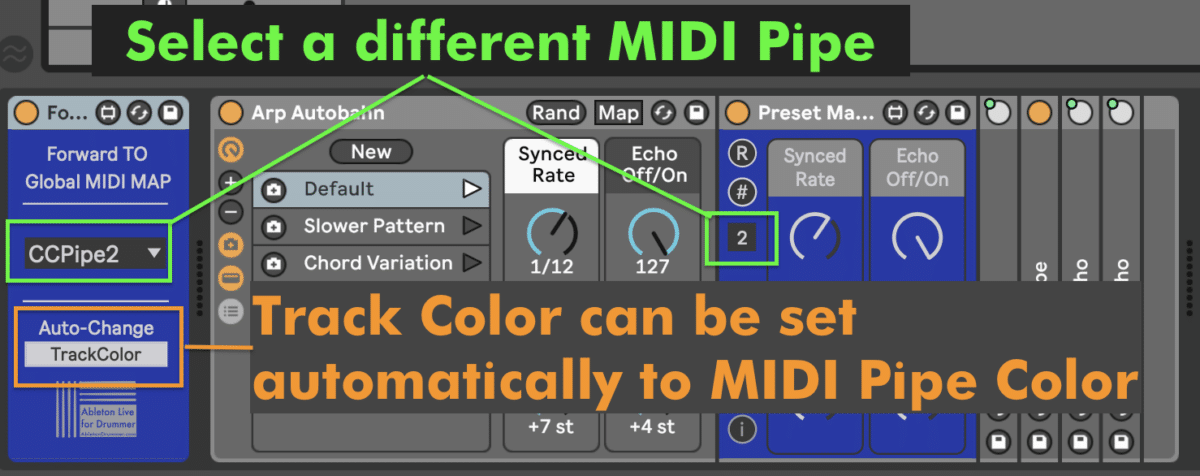
For those eager to explore advanced features, the ‘Global MIDI Map’ plugin offers the option to create multiple MIDI pipes. This feature allows you to send MIDI data to specific effects racks based on the selected pipe.
Organically Automating MIDI Pipes:
Automate MIDI pipes organically, controlling which devices receive MIDI data. This feature proves invaluable for dynamically switching between different effects and device configurations within a set.
Just select or automate the MIDI Pipes you want to send and receive. When you change a pipe the device will change its colour to visualise which MIDI connection the device is connected to. The “Forward To” device can automatically set the tracks colour of the MIDI track.
‘Global MIDI Mapping’ let’s you save midi mapping in Ableton Live:
In conclusion, the plugin is a powerhouse for mastering MIDI mapping in Ableton Live. This approach will speed up your workflow and gives you a highly customisable technique to set up your own global MIDI MAP presets, save MIDI Map in Ableton and recall your MIDI Map presets in Ableton Live sets quick and easy.
More resources on how to save and recall global MIDI Mappings in Ableton Live
I created a video run-through tutorial for saving MIDI mappings, which you can check out below or directly at Youtube.

You can find more info on how to install Max for Live devices HERE.