
Ableton Live doesn’t natively let you skip sections during arrangement playback without manually stopping and jumping ahead. However, the JUMP SECTIONS IN ARRANGEMENT M4L device makes it easy to automate playback exclusion in Ableton by marking sections to skip automatically. This workflow works perfectly for testing arrangements without breakdowns, trying alternate song structures, or practicing live sets with flexible section omissions. This is an approach which works great in the studio. We don’t suggest using it for live performance as it might, depending on your computer and Ableton set lead to small crackles in audio when jumping to a certain point.

What You Need to Automate Playback Exclusion in Ableton
Before you automate playback exclusion in Ableton, gather these requirements:
- Ableton Live 11 or 12 (the device works on both versions)
- Max for Live (included in Live Suite or available as an add-on for Live Standard)
- The Jump Section in Arrangement device from AbletonDrummer.com
- A MIDI track in your arrangement to host jump markers
The Jump Section in Arrangement device functions similarly to Logic’s cycle jump feature making this now possible in Ableton Live. Consequently, you gain precise control over which sections play and which sections your playback skips entirely.
How to Set Up the Jump Section in Arrangement in Ableton
First, load the Jump Section in Arrangement device onto any MIDI track in your Live set. This track serves as your exclusion control track where you’ll mark sections to skip.
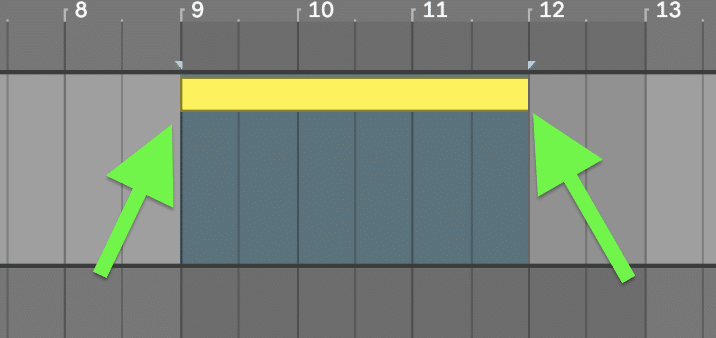
Next, identify the section you want to exclude from playback. For example, if you want to test your track without the breakdown section, locate that breakdown in your arrangement timeline. Then select the exact time range you want to skip by clicking and dragging across the clip area on your MIDI track.
Create Jump Markers to Skip Sections
Once you’ve selected the section to exclude, press Command + Shift + M (or Ctrl + Shift + M on Windows) to create a new MIDI clip. This clip acts as your jump marker – when playback reaches this clip, the device automatically skips to the end of the marked section.
Make sure the clip area is empty before creating your jump marker. If existing clips occupy the space, delete them first. Otherwise, the jump marker won’t work correctly. You want to make sure that
After creating your jump markers, click the “Refresh Jump Clips” button on the Jump Section in Arrangement device. This step is crucial because the device needs to read and register where your jump clips exist in the arrangement.

Test Your Automated Playback Exclusion
Now press play in your arrangement. You’ll immediately see the playhead jump over your marked section, effectively creating automated playback exclusion in Ableton. The audio skips seamlessly from the start point of your jump marker to the end point, leaving out everything in between.
Additionally, you can create multiple jump markers throughout your arrangement to exclude several sections simultaneously. This technique works perfectly for:
- Testing tracks without intros, outros, or transitions
- Skipping breakdowns during practice sessions
- Creating alternate arrangement versions quickly
How to Adjust and Refine Your Jump Markers in Ableton
If you need to change the length of an excluded section, simply adjust your jump marker clip length in the arrangement. However, remember to click “Refresh Jump Clips” on the device after any changes. The device must re-read your jump clips to register the new exclusion points.
Furthermore, you can MIDI map or key map the refresh function for faster workflow. This approach makes sense when you frequently adjust jump markers during arrangement sessions, because you can refresh with a single button press instead of clicking the device.
Best Practices to Automate Playback Exclusion in Ableton
For clean, predictable results when you automate playback exclusion in Ableton, follow these guidelines:
Start jump markers on the one: Begin your exclusion clips exactly on bar one (or other strong beat positions). This ensures smooth transitions when playback skips forward.
Use full bar lengths: Mark complete bars rather than partial measures. Your jumps will feel more musical and maintain proper song structure.
Refresh after every edit: Always click “Refresh Jump Clips” after creating, deleting, or resizing jump markers. The device cannot detect changes automatically.
Name your exclusion track: Label your MIDI track clearly (e.g., “Jump Markers” or “Skip Sections”) so you can quickly identify it in busy arrangements.
Why the Jump Section in Arrangement Device Improves Your Workflow
Before this device, testing arrangement variations required destructive editing, complex routing, or tedious manual playback control. Moreover, comparing your track with and without specific sections meant constantly enabling and disabling clips – a workflow that breaks creative flow.
The Jump Section in Arrangement device changes this entirely. You can now audition different arrangement structures in seconds simply by creating or removing jump markers. This non-destructive approach lets you experiment freely without compromising your original arrangement.
The device is availble here and requires Max for Live (included in Ableton Live Suite or available as an add-on for Live Standard). Once installed, you can automate playback exclusion in Ableton across all your projects, making arrangement experimentation faster and more creative than ever. Make sure to also check out the full video tutorial below.


