With the Convert Midi Devices Pack you can now easily convert any type of the three primary MIDI message types. If you are using Ableton Live for performing, producing, sound designing, or almost any situation, you’re probably using midi. Perhaps you use a midi controller for remote mapping the Ableton Live Set. Or you send midi to your outboard gear like synthesizers and drum machines. Maybe you’re totally “in the box” and routing midi clip notes and automation around your Live Set. You may even route midi in and out of other programs on your computer or network.

Regardless of the nearly infinite ways to use MIDI messages, sometimes you just need to convert one type of message into another. This can be a huge help to your Ableton Live workflow and creative process. This can help you to make the most out of your gear and Ableton Live Set.

There are many useful scenarios for any of the midi conversions available with this Max For Live device pack.
In this article we’ll first establish some of the midi routings that you’ll want to be familiar with. After that we go through each type of input message. We will look at some use cases for the different types of conversions.
Midi in and out routing setups for Ableton Live.
Because these devices operate inside of Ableton Live midi tracks, you want to be familiar with a few specific terms. This will help get the most out of the device pack.
Track input in Ableton Live
You can use any midi device/port with track input enabled in midi preferences as an input to a midi track. This could be a midi controller that sends notes/CCs/program changes. Any midi track can select another midi track in the Live Set to receive input from.
Track Output in Ableton Live
You can use any MIDI device/port as a track output. You will need to activate this output in Ableton Live’s MIDI preferences. This could be an external piece of software or hardware (synth/ drum machine) that accepts notes/CCs/program changes. It could also be set to send to another midi track in the session.
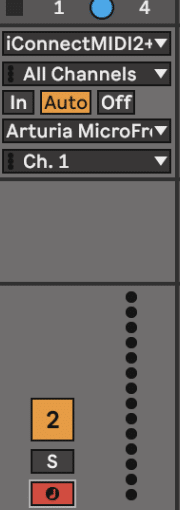
Here’s an example of a track with an iConnectivity midi interface as track input. The Track output has the Arturia Microfreak synthesizer selected.
MIDI Remote input in Ableton Live
Any midi device/port that has remote input enabled in midi preferences can have its messages remote mapped to controls in the Live Set. This can get tricky if you’re using something like a midi keyboard to play virtual instruments with track input,. If you also remote map the notes it sends, those respective mappings will be triggered every time you play any mapped note. The notes you mapped won’t play any sounds anymore. They will trigger ‘only’ the remote MIDI mapping.
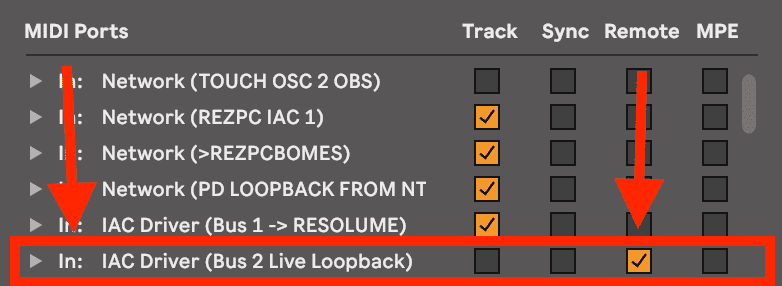
Here is how you would enable a device for remote input in midi preferences. In this example we’re enabling a device called IAC DRIVER (Bus 2 Live Loopback)
Midi remote loop
You can as well use virtual MIDI ports. They can create midi connections between pieces of software on the same computer. (Built in IAC busses on Mac OS or something like LoopBe on Windows). You can set up a midi remote loop by enabling track output and remote input for a virtual midi port. Then you can send midi notes/CCs/program changes out of track into the port, and remote map those messages to the Live Set as they come back in “remote enabled”. Using this technique can open up huge potential for dynamic midi mappings, and very flexible control over your Live Set.
We’ll be referring to these configurations through this article to more clearly illustrate possible use cases for the devices in this pack.
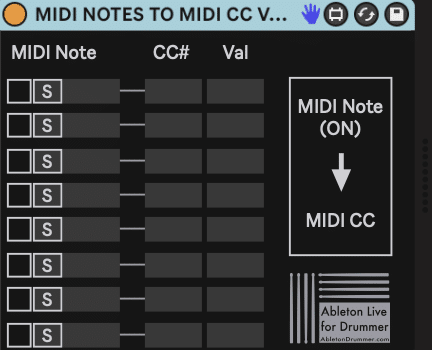
Convert midi notes into midi CC values.
The ability to easily turn midi notes into midi CCs can open up a lot of expressive capabilities as well as /techniques that can help you program an even smoother performance.
Here are a few examples of how you can use this to expand your Ableton Sets.
•Turn a controller that only sends midi notes into CCs that can be mapped or sent out to hardware or other software. Enable the controller for track inoutand then set the track output to the destination that needs to receive the CCs
•If you have a piece of hardware that can receive CCs to modulate or change parameters, set it as the destination for track output. You can use midi notes coming into that track from an input (or from notes in midi clips) to activate specific CC values to change the hardware’s parameters when specific notes play.
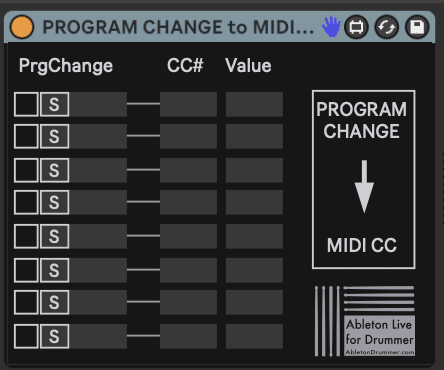
EXAMPLE: If your synth’s cutoff is controlled by CC 4, and you want note A1 to turn the cutoff to 50% (value 64 in midi speak), you would set up the device like so.

Now everytime the track input or clip sends midi note A1, the synth’s cutoff will change to 50% value. This can be a great technique for sound design.
More Examples on converting MIDI notes to MIDI Continuous Control Messages
• Use a midi instrument as track input and virtual midi port for lighting software as track output to use notes from an instrument or midi clip to change parameters in lighting software that receives CCs.
• Use a midi controller as track input and the midi remote loop as track output to create midi mappings for a controller that isn’t remote input enabled. Create multiple versions of the note to CC device with different outgoing CCs and alternate devices on/off states to change your controller’s remote mappings.
•Sequence out parameter changes on a piece of hardware or other software by using a clip with notes.
Convert midi notes or CCs into midi program changes.
Program changes are a way to change presets or patches. Many midi enabled devices such as synthesizers, drum machines, FX units and plug-ins are using those.
Sending program changes is notoriously limited in Ableton Live. You are limited to one program change per clip. This will be sent when the clip first plays, instead of being able to automate them throughout a clip. This makes it tricky to create a sequence of program changes without using multiple clips. If you work in session view, this can really complicate things.
Using the notes or CCs can make managing program changes much more flexible.
Here are a few use cases to inspire your workflow.
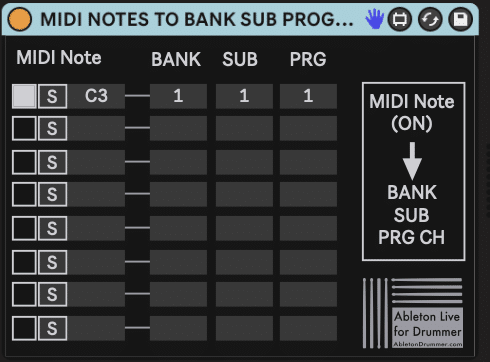
•Define which notes will trigger which program changes within the device. Then create a clip the length of your song that uses notes to tell the hardware when to change presets.
Examples on changing MIDI Notes to Program Changes
If you set note C3 to send program change 27, and you put note C3 on bar 17, the synth will change presets after 16 bars. This makes it MUCH easier to sequence out the program changes for a piece of hardware or plug-in through the course of a song or entire show!
•Use one CC but different values of that CC to sequence program changes.
EXAMPLE: To make different values of CC 1 trigger different program changes, set the device up like this:
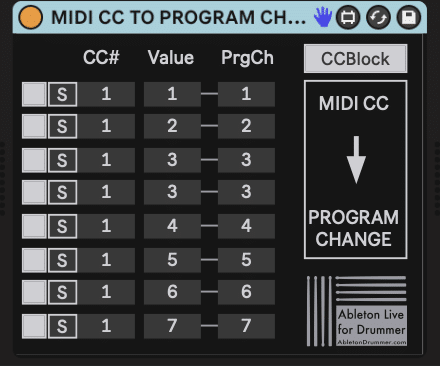
In this case CC 1’s values 1-7 will convert to MIDI programs 1-7.
You could create automation like this in a clip or in Ableton Live’s Arrangement. This way you can use a midi clip to sequence program changes.
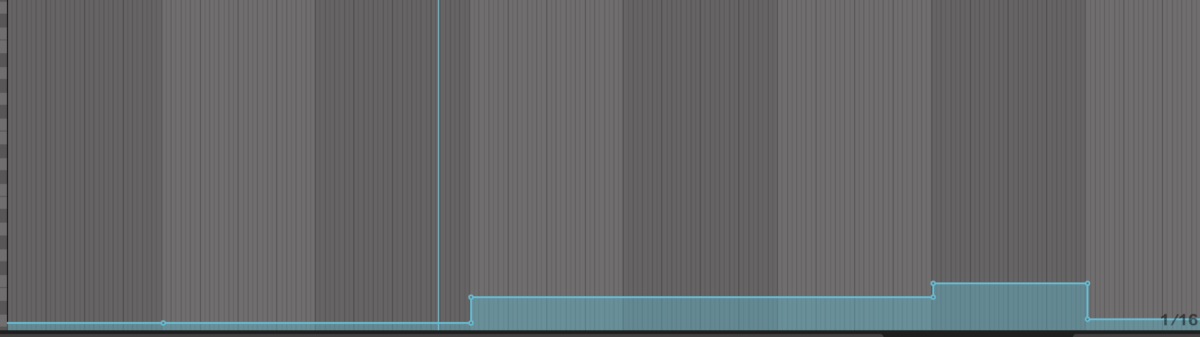
This clip has CC 1 changing values at different points in a song to trigger patch changes at specific moments.
•You can use a midi controller that sends notes or CCs only as track input. Set the desired hardware/plug-in as the track output and use the controller to easily change patches.
• Trigger different patches of a synth/plug-in/midi instrument when you play specific notes.
• Use knobs/sliders that are remote mapped to the Ableton Live Se. This way you cant simultaneously change patches on specific hardware when a remote mapped effect is tweaked.
Examples on converting to MIDI Program Changes
EXAMPLE: If you have a knob that sends CC 20 remote mapped to the dry/wet of reverb, you can make it so when the dry/wet knob is turned to a midi value of 80, program change 8 is sent out to a desired destination.
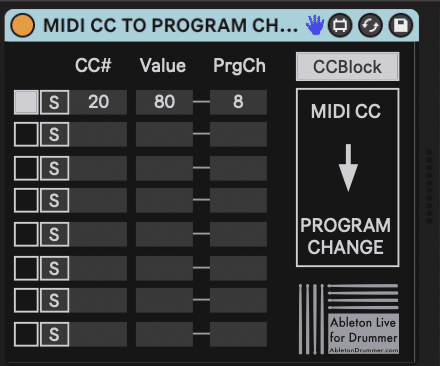
First make the track and add the device. Then set that track’s input as the controller. This is how you would set up the CC to Program Change device.
There are two versions of this device. The advanced version allows you to choose additional program change values (Bank and Sub bank) that some devices require.
Convert midi program changes into midi notes or midi CCs
If you’re using a synth/drum machine/hardware or plug-in that sends program changes when patches/presets are changed, then you can create different resulting actions within your Live Set when patches are changed either remotely or on the device itself. Sometimes an old piece of hardware can only send program changes. Converting MIDI messages can allow you to get more capabilities based on what the device can send.
• You can use preset changes on a device to trigger/moduate something that is remote mapped. You would set the track input as the device that sends program changes. Set the track output as the midi remote loop. Then you can have patch changes on the device turn into notes or CCs. They will go out the loop and come back as remote mappings.
EXAMPLE: You could use this to turn a specific effect/track turn on or off when a specific patch is selected on the device.
•You could send a specific note to a synth to be played when it is changed to a specific patch. Set the track input as the device that sends program changes and the track output as the instrument you want to play the defined note.
•Adjust settings in another piece of software based on a selected patch on a piece of hardware or virtual instrument.
EXAMPLE: If you wanted to use a CC to change lighting color in a lighting software, and the lighting software uses CC 22 to define a color value. You could set the track output as the midi port that sends to the lighting software and make different incoming program changes send different values of CC 22 to create different colors for different patches/presets.
Convert midi CCs into midi notes.
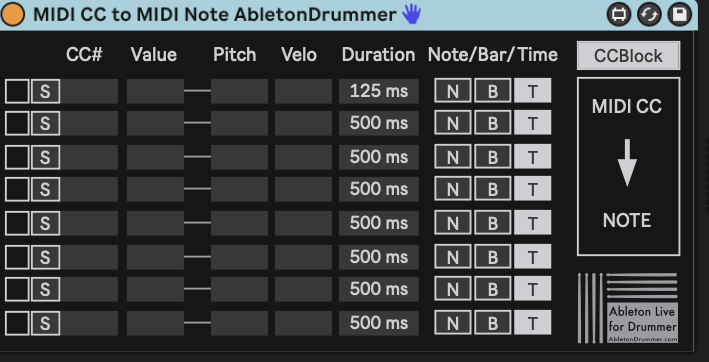
Turning midi CCs into notes can be used in some cool ways that can open up possibilities for sound design, generative melodic/harmonic content, and much more. Here are a few interesting ways that you can use this midi conversion.
•Play instruments with sliders or knobs or midi automation in clip. Drop the CC to note device in a track that has track input from a controller that sends CCs (or you can use midi automation in a clip). Set Track output to a hardware synth or use this setup on a track with a virtual instrument on it. Now knob values can send different notes or specific knobs can send specific notes at specific values.
•If you already have something remote mapped to a midi note you’d rather ont change, and want to access that mapped object with a CC from a different controller, you’re in luck! You can use the controller as track input. Set track output to the midi remote loop. Convert that CC into the note that is mapped to the object you want to control.
Use multiple devices set with different outgoing notes from the same CCs and toggle devices to create new mappings.
•Use this to send a specific note to a midi instrument when a remote mapped parameter is modified. Use the remote mapped controller as the track input and set the track output to the desired instrument. Use the same CC that is remote mapped to the Live Set. You can convert it to the note you want to send to the instrument when it hits a specific value.
You can set the duration of the outgoing note in beats, bars or time for additional tweakability.
In conclusion.
Although there are a good amount of examples in this article, this is only a tiny portion of the massive amount of possibilities you can use these devices for. Hopefully these examples can help illustrate the greater concepts they use, and thusly inspire you to find ways you can adjust those techniques and concepts to suit your specific needs.