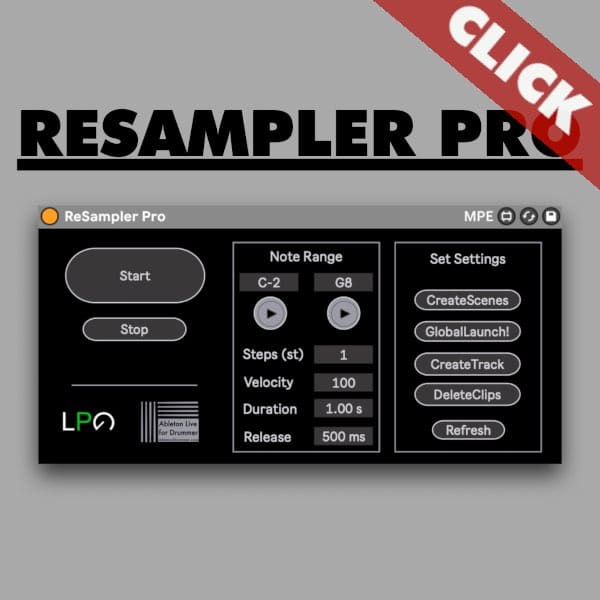
In this guide, we delve into how to resample VST with Ableton Live with the free ReSampler Pro Max for Live plugin, a game-changer that allows you to capture and manipulate the essence of your favourite virtual instruments. This technique proves especially cool for live gigs, enabling you to save precious CPU resources and ensure a glitch-free performance. Resampling acts as a bridge, overcoming compatibility limitations with hardware like the Push 3, making your VSTs seamlessly integrated into your live setup.
When you download the “Resampler Pro” you will get a pdf with links to set-up and instructional videos. Please take the time to watch those.
You can download the free “Resampler Pro” Max for Live device HERE!
The Resampler Pro was an idea from Dan from Live Producer Online and the Max for Live programming was realised from Tobi from AbletonDrummer.com. You can find more (free) Max for Live devices here.
STEP 1: Resample VST with Ableton using the Resampler Pro
Let’s dive into the basics of using Resampler Pro to create sample packs or multi-sample individual notes for live performances.
Recording single note pitch samples of a VST
- Load ReSampler Pro and set the Note Range, Velocity and Duration:
- Load Resampler Pro on a MIDI track.
- Choose the note range you want to capture.
- Set parameters like velocity and duration.
- Creating Scenes:
- Click “Create Scenes.” on ReSampler Pro. This creates scenes for each note in the selected range.
- Setting up for Recording:
- Turn off Global launch to eliminate delays via click on the “GlobalLaunch!” button
- Create a track to record individual clips via click on “CreateTrack”
- Initiate Recording:
- Hit start, and Resampler Pro will begin sampling each note in the selected range.
- Crop and Organize:
- Crop the recorded clips for file naming and sample organisation
- Save the wav clips in a folder for future use or directly perform Step 2
Step 2: Loading and Organizing VST Samples in Ableton Live Sampler
2.1 Open up an empty Sampler instrument to resample VST with Ableton Live
Navigate to the Ableton Live sampler instrument in Ableton’s Browser and place it on a MIDI track. Open the “Zone” view tab via click on “Zone”.
2.2 Import Samples into Sampler
Opt for the “Key” zone option within Sampler. This view gives you the ability to organize your VST samples according to their respective note pitch.
2.3 Organizing the Samples pitch
Just drag and drop your crafted VST samples into the Zones area of the Sampler.
2.4 Ensuring Accurate Pitch Playback
Highlight all samples, right-click, and select “Distribute Ranges Equally.” If you have created 128 samples the distribution of MIDI Pitch to Samples pitch will match up. If you have less then 128 samples you will need to apply the pitch and key ranges accordingly.
2.5 Fine-Tuning for Limited Samples
For scenarios with a limited number of samples, implement a dummy clip strategy within Resampler Pro to seamlessly fill the gaps. Duplicate the dummy clip to match the desired number of notes, maintaining a consistent distribution.
Step 3: Fine-Tuning with Ableton Live’s Tuner
3.1 Verifying Pitch Precision
Leverage Ableton Live’s tuner to ensure the utmost precision. Play notes on your computer keyboard or draw MIDI notes to verify that each note aligns flawlessly with the samples in the zone, achieving a harmonious and well-tuned result. You are able to apply tuning of each individual sample via the “Detune” field in the Sampler.
Step 4: Save Your VST Instrument in Ableton Live
4.1 Save the created Sampler
Just drag and drop the Sampler with the applied and imported samples into your User Library in Ableton Live. This will automatically copy the samples within this preset. Please make sure that you back up your User Library regularly.


