The “Kit Selector” Max for Live device lets you change kit-presets of your Roland TM-6 PRO (Get yours here!) *affiliate link* with Ableton Live. You can automate changes via MIDI clips, use e-drum pads via MIDI MAP. The Max for Live device monitors the kit selection.
Download the device HERE!

Set Up the TM-6 Pro with Ableton Live
You first need to establish a MIDI connection between your computer and the TM-6 PRO. The only way to make the TM-6 PRO to receive MIDI is to connect it via the USB port. (There is one 5-DIN MIDI port on the TM-6 PRO but this is only for sending MIDI out.)
Per default the USB driver mode on the TM-6 PRO is “GENERIC”. This means that you don’t have to install a driver on your computer/Mac. You can receive and send MIDI between the two devices instantly. MIDI in and out ports will show up in Ableton Lives MIDI preferences.

However if you want to use the TM-6 PRO as an external sound card or route the audio from it into Ableton Live. You would need to set the Driver Mode to “VENDOR” and install the driver on your computer/Mac. There is a description on how to do this in this post here.
I usually advise my clients to only activated the MIDI ports which are currently in use. Feedback and Loopback MIDI can cause critical issues and it is a good idea to keep things as clean as possible here.
For the the “TM6-PRO Kit Selector” you will just need to activate the TRACK IN and the TRACK OUT MIDI port.

MIDI routing in Ableton Live
You now want to place the “TM6-PRO Kit Selector” Max for Live device on a MIDI Track. You need to set the “Midi From” on this track to “TM-6 PRO” and select channel 10. Do the same selection for the “MIDI To”.

Note: The default MIDI CHANNEL on the TM-6 PRO is Channel “10” . If you change this setting you obviously need to change the receiving and sending channels here as well.
Switch on ARM or Monitoring for MIDI from TM-6 Pro
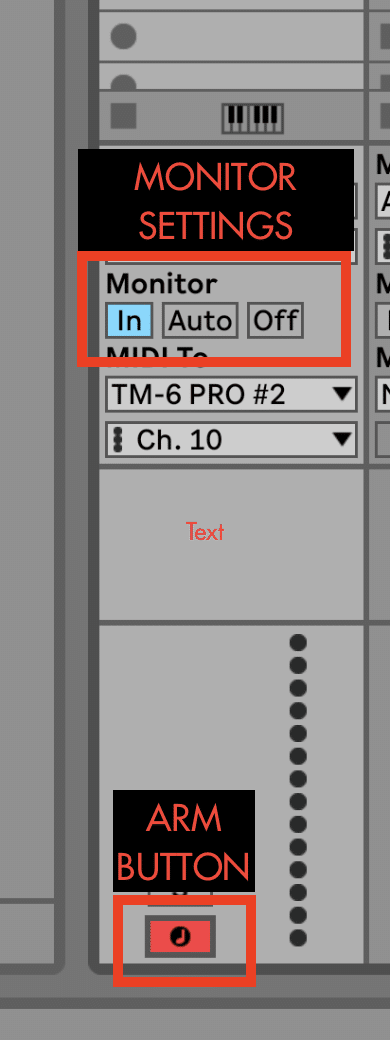
You are now ready to switch kits from within Ableton Live, make sure that the track you are using is receiving MIDI as well. e.g. “ARM”ing the track – this means pressing the ‘record’ placed down on the track. You could as well set the Monitor on this track to “IN” – this way the track will always and only(!) listen to the source which is selected in the MIDI from section.
Automate Kit Changes for TM-6 pro with Ableton Live
You can automate kit changes in MIDI clips in the envelope section. Just create a new MIDI clip by double clicking on an empty slot. Select the envelope view and select the “KIT” parameter. Here you can set dots by double click on the red line. You could now move those dots up and down towards the kit you want to be selected automatically. Kit-presets on the TM-6 Pro will now change automatically when this clip is being triggered.

CHECK OUT FULL ONLINE COURSE ON SPD-SX WITH ABLETON LIVE