

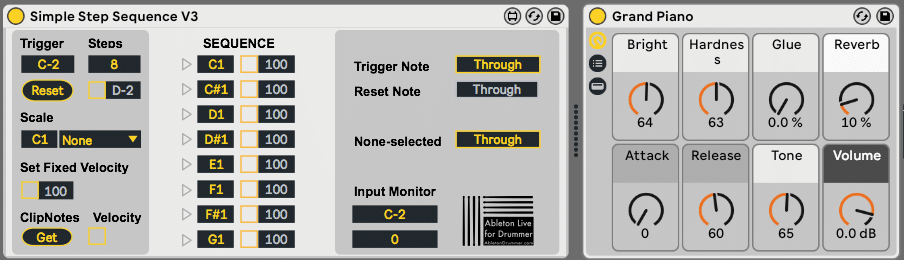
The Simple Step Sequence device lets you step through a midi note sequence of up to 8 notes pitches (the”Long” version up to 32) triggered by one incoming midi note from one certain pre-set pitch.
Just place the Simple Step Sequence device in front of an Ableton instrument e.g. a Grand Piano Sampler preset.

How to use the Simple Step Sequence in Ableton Live?
Set the trigger note to play a sequence
Under “Trigger” you can set the note pitch which will trigger the sequence. You can set mouse (click and drag up and down), by your keyboard arrows (select the field and use up and down arrows) or by your comuter keyboard (select field and type in desired value and press enter)


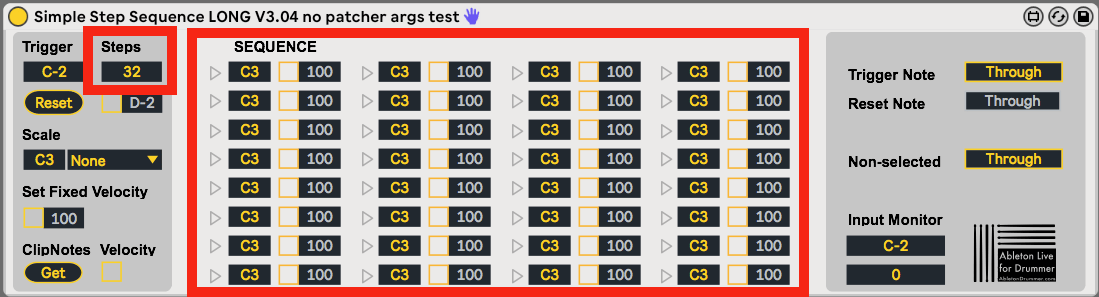
Set the number of steps for sequencing
Under “Steps” you can set the number of steps/notes for the sequence to step through.

On the Simple Step Sequence LONG version you are able to set up a sequence with up to 32 steps/notes.
Reset Sequence of notes in Ableton Live
You can reset the sequence to start from the beginning again by clicking on the “Reset” button.
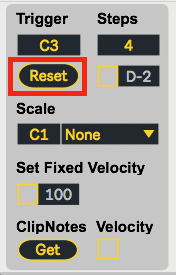
You can as well set this function to be triggered by a midi note by checking the box just right to this button. You can set the pitch on the now active box on the right.

Change Note Pitches in Ableton for Sequence
You have 3 ways to edit the note pitches of the sequence:
-Individual
-Scale
-ClipNotes import
Individual
You can set individual pitches just right in the pitch box for every note .
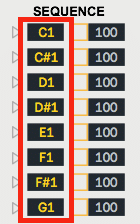
Scale
You can set the sequence to a certain scale.
Pick the root note and a scale and the sequenze will be set to this.

Clip Notes Import in Ableton Live
You can import notes from a midi clip. Select the notes you want to import in midi clip. While keeping those notes selected go back to the Simple Step Sequence device and click on the “Get” button on the bottom left.

Velocity for notes in Ableton Live
You can decide if you want to use your live-playing/triggering velocity or if you want to use a pre-set velocity for every note (individually)
You have 3 options to edit the pre-set velocity:
-set a fixed velocity for all notes
-set a fixed velocity for individual notes
-import the velocity when you import note pitches from a midi clip
Set a fixed velocity for all notes
First you need to check the “Set Fixed Velocity” box. This will activate all “Set” velocity boxes for all notes as well as de-select all when turned off. The velocity value box is now activated and you can put in your desired values. If active changes will change all individual velocity boxes for all notes.

Set a fixed velocity individual notes
You can activate the pre-set velocity function for every note/step of the sequence individually by (de-)activating the boxes next to each pitch field on the right. This will (de-)activate the velocity value box for each note, where you can put in your desired velocity values.

Velocity from imported notes
When you import midi notes from clips you can import their velocity values as well. For this you need to turn on the “Velocity” box next to the ClipNotes “Get” button before you import the notes.
Per default turning on this box will as well switch on the “Set Fixed Velocity”/ all pre-set velocity boxes for each individual note.

Watch a video tutorial about importing midi note pitch from clips:
MIDI Through functions in Ableton
Trigger Note
In some use cases you want the “Trigger Note” which is used for triggering the step sequence being send to the instrument to trigger a sound/note as well. You can (de-) activate this function via the Trigger Note “Through” button.

Reset Note
This works the same like for the trigger note. For this function the ‘Reset-by-Note’ needs to be activated.

None-Selected
If you have a midi track where you just want the notes from the selected sequence notes to trigger sounds you can block all other notes coming into this track via having the “Through” button de-activated. This way only the notes selected in the sequence will get ‘through’ = trigger sounds.
If you have more then one midi effects on one track which are triggering/for creating sounds you can activate the “None selected Through” button if you need other notes to pass through.

How to set MIDI “Through” in Ableton Live Examples:
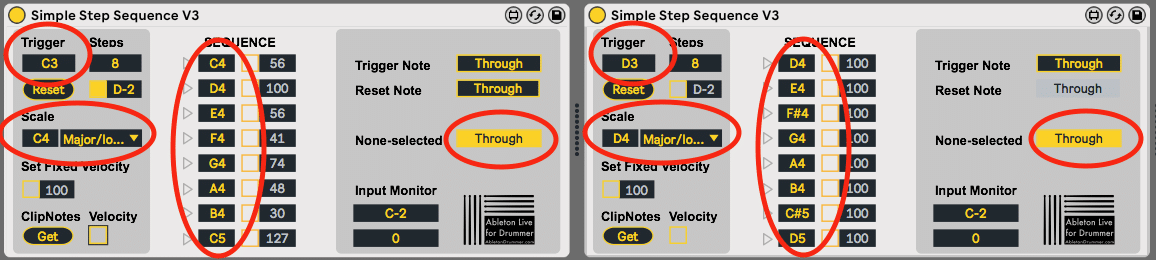
1) You have one Simple Step Sequence device set to trigger a C4 Major scale via the trigger note C3.
All other incoming notes then C3 should not trigger any sound – the None-selected “Through” needs to be de-activated.
2)You have one Simple Step Sequence device set to trigger a C4 major scale via the trigger note C3 and you have a second Simple Step Sequence device on the same track to trigger a D4 major scale via the note D3 – the None-selected “Through” needs to be activated on both devices so all notes can pass through.
“D3” – Trigger note for second Simple Step Sequence needs to pass through the first device
C4 major sequence from first device needs to pass through the second device.
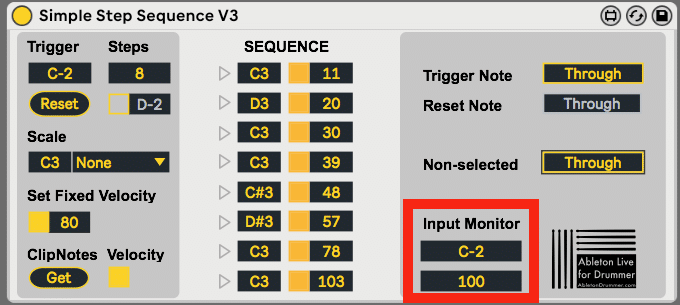
Input Monitor for Simple Step Sequencer
The Input Monitor will show you the last played incoming midi note pitch and its note on velocity.
Get more info on Ableton Live – Logo with link for more info
If clicking on this logo, you will be taken the the Ableton Drummer blog, where you can find some more info on this and other devices.