
If you want to streamline your live looping workflow, Create Clips from Ableton Live Looper is the tool you need. Part of the Ableton Looper Tools Collection, this Max for Live device makes it easy to transform your live loops into clips in Ableton’s Session view, ready for playback and further arrangement. Let’s break down how this device can elevate your loop management and enhance your creative flow.

Dynamic Loop Control in Ableton Live
Using Ableton Live’s Looper with the Create Clips from Ableton Live Looper device gives you direct control over your looping sessions. Instead of relying on preset BPMs, you set the tempo naturally by playing your first loop. This approach lets your groove dictate the session, giving you an organic feel. Once captured, your loops can be converted into clips with a single MIDI trigger. Ensuring a seamless transition from live play to clip-based arrangement.

Mapping MIDI controller buttons to the Create Clips from Ableton Live Looper lets you capture loops with a single press. The device automatically detects MIDI notes, CC, or program changes, making setup straightforward. This integration eliminates complex routing, letting you focus on your performance. Using MIDI controllers that sends MIDI messages, you can quickly export loops, launch clips, and clear the looper with minimal effort.
This tight MIDI integration keeps your session flowing, whether you’re performing live or working in the studio. It transforms your Looper into a performance instrument, making clip export and arrangement fluid and intuitive.
You are able to use the native blue Ableton MIDI Mapping to set up your controller here as well.
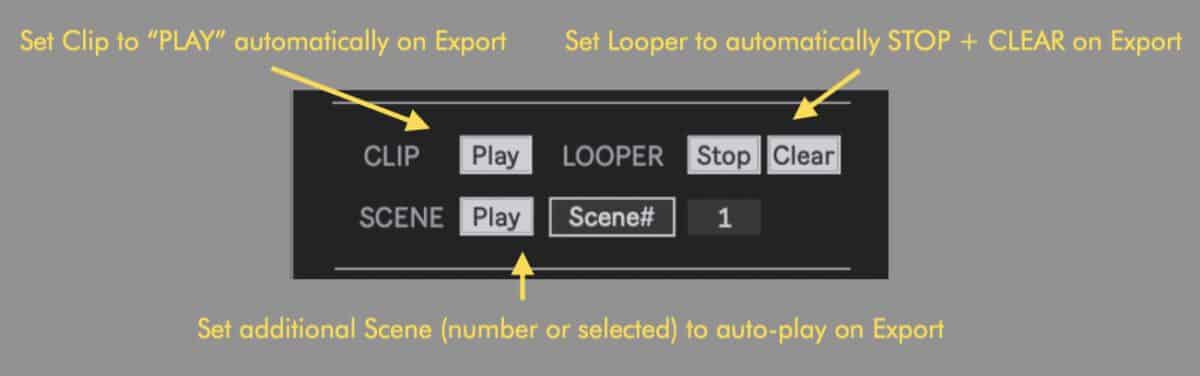
Streamlined Play, Stop, and Clear Workflow
The Ableton Looper Tools Collection isn’t just about clip export — it’s a comprehensive suite designed for live performers and producers. The Create Clips from Ableton Live Looper device simplifies loop exporting plus additional automate-able functions. You can configure this process to suit your needs. Whether you want the exported clip to autoplay, stop the looper, or clear it for new material. This removes the manual drag-and-drop steps and keeps your workflow uninterrupted.
With Create Clips from Ableton Live Looper, you can automate clip playback and looper management. Once a loop is exported as a clip, the device can immediately launch it in sync with Ableton’s global quantization. You can automate stop the Looper, and clear its content for the next idea. This keeps your live set tight and reduces the risk of overlapping audio or clutter.
Export Looper Content To specific Track and Scene or enable dynamic export to empty Clip Slot
You can set the device to export to a specific track and fixed scene, ensuring your session stays organized. When the set clipslot already has a clip it will be automatically re-placed. You can enable “NextEmpty” to preserve all exported clips and have the device looking for the next empty clip slot to export the clip there. Another option would be to set the clip to be exported to the next tracks(s) on the right in a specific scene. This enables having each single layer being playing at the same time on different tracks. This technique can be useful to incorporate with The One Button Live Looper, a different clip-looping M4L tool for live looping.
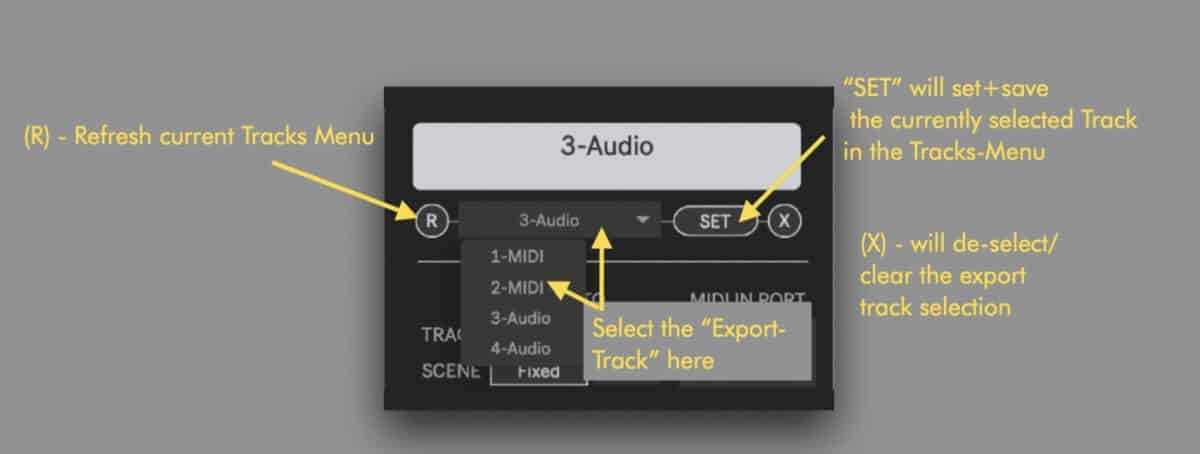
Set and customise export of Ableton Looper content to fixed or dynamic track, scene and clip slot.
Fine-Tune Your Export Settings for a Professional Touch
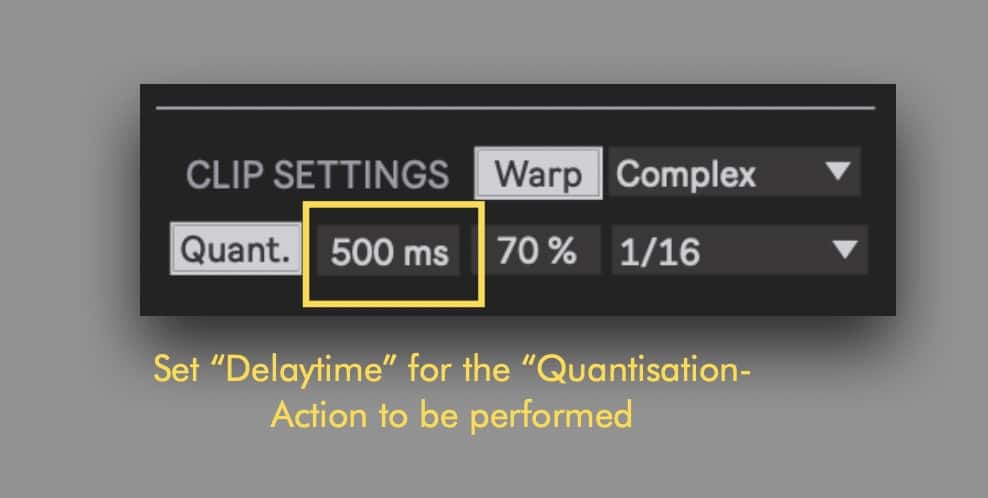
The device also lets you tailor how clips behave post-export. Adjust warp modes to fit your loop’s sonic characteristics—whether you need rhythmic precision with Beats mode, pitch stability with Tones, atmospheric preservation with Texture, or complex blending. Automatic quantization ensures your exported clips sync perfectly with your session, maintaining groove consistency even during fast-paced performance.
The Quantisation Feature needs to be handled with care. Audio quantisation not always leads ‘tight results’ and setting one transient right on the spot might lead to unwished delays of audio content after. Ableton Live will need some time to buffer the newly exported clip before the quantisation command can be received and applied. For longer loops you might need to set the “Quantisation Delay” time higher. Again handle the quantisation option here with care and it is always better to focus on rehearsing and training your timing then trying to fix things afterwards.
Do not miss the extended video tutorial below.
Elevate Your Workflow with the Ableton Looper Tools Collection
The Create Clips from Ableton Looper can be purchased as a single device here or as part of the Ableton Looper Tools Collection. This collection equips you with a suite of Max for Live tools designed to simplify loop management, enhance creative possibilities, and streamline your entire workflow.
Whether you’re crafting loops in the studio or performing live, this Ableton Looper M4L Pack gives you total control over loop capture, clip export, and playback. It’s the ultimate tool for turning spontaneous ideas into polished, arrange-ready clips, saving time and maximizing creativity.
Ready to supercharge your Ableton Live looping workflow?
Get Create Clips from Ableton Live Looper and the full Ableton Looper Tools Collection today. Capture loops, export clips, and keep your performance flowing smoothly.


