
When sketching out new ideas on the fly and live performances most people use Session View. For live performances you want to set up scenes to play next scene automatically. Unfortunately the selection of scenes won’t follow automatically, creating a gap in your workflow that can interrupt performances. The good news? There’s a complete solution with specialized Max for Live devices designed specifically for performance scenarios.

How to trigger the current selected Scene in Ableton Live
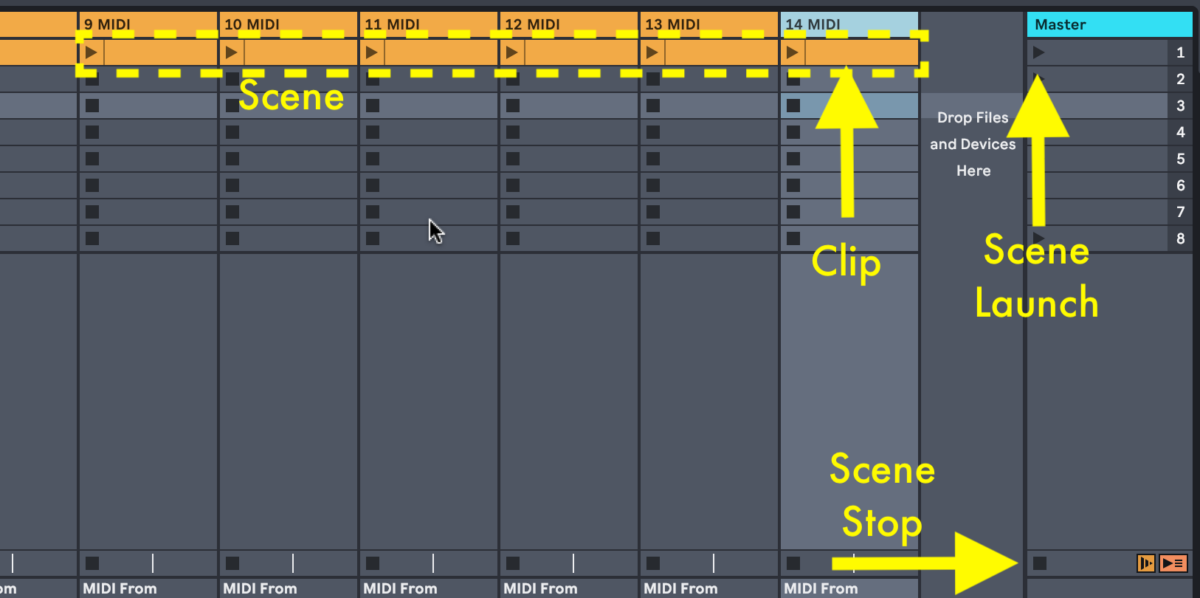
In the Session View you can play all the Clips in one Scene at the same time using the play button on the Master Track.
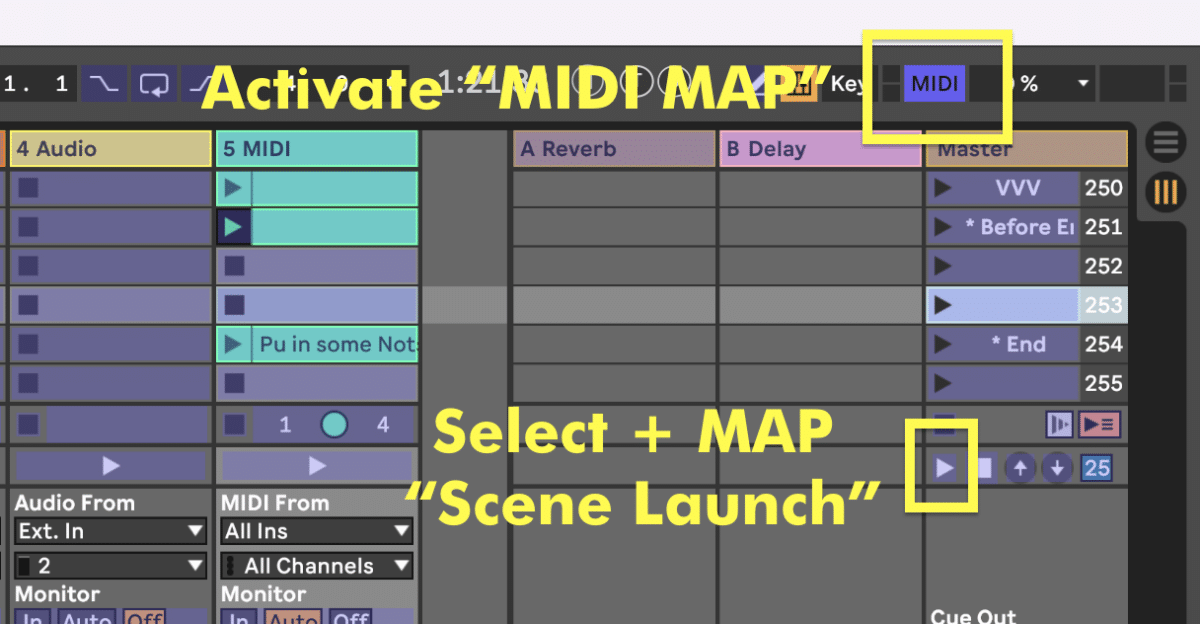
Use MIDI Map Mode (CMD + M) or Key Map Mode (CMD + K) to control the Selected Scene Launch button with an external MIDI Controller such as a button, MIDI Trigger, or e-Pad.
Trigger Next Scene Automatically with Follow Actions
You can set up multiple Scenes to play automatically by using Follow Actions on the Master Track. Follow Actions allow you to make decisions about what happens after a certain amount of time. Choosing the Next follow action on your Master Track will automatically trigger the following Scene after a specified amount of time. Click a Scene slot on your Master Track to reveal the Follow Actions Menu. (You may also need to press shift + tab).
- Turn on Follow actions
- Choose which actions you would like from the dropdown menus
- Set the Chance Controls to decide the likelihood of each Follow Action to Happen
- Set your Action Time to determine how long to wait before the Follow Action is triggered
- Make sure your Global Follow Actions Button is activated, otherwise no Follow Actions will work.
The Scene Selection Problem in Live Performance
Here’s where many performers hit a roadblock: when you use Follow Actions to play next scene automatically, Ableton doesn’t automatically select the next scene. This creates a frustrating workflow issue. Imagine you’ve set up Follow Actions to play through scenes 1, 2, 3, and 4 automatically. Scene 4 finishes playing, but the selection is still stuck on scene 1 or 2. When you want to trigger scene 5 with your MIDI controller or keyboard shortcut, you’re forced to manually click the scene first. During a live performance, this breaks your flow and can lead to mistakes.
This happens because playing a scene and selecting a scene are two completely different things in Ableton Live. Scene Follow Actions handle the playing, but the selection stays where it was unless you manually move it or have specific preferences enabled (which don’t always work with Follow Actions).
The Scene Selection Navigation Pack for Ableton Live
AbletonDrummer.com offers a comprehensive pack to solve every scene selection and triggering challenge for live performers.
How to Select Scene by Name in Ableton – Jump to Any Scene Automatically
The Select Scene by Name device provides the most direct approach to scene navigation: simply choose which scene you want to jump to from a dropdown menu, and the device handles the rest. This is perfect for non-linear performances where you need to jump between different songs or sections that aren’t arranged sequentially.
How to use Select Scene by Name:
- Add the device to a MIDI track
- Click the refresh button to populate the device menu with all your scene names
- Select the clip slot where you want to create a navigation clip
- Choose your destination scene from the dropdown menu (e.g., “Another Song”, “Encore”, “Second Song”)
- Click “Create Clip” – the device generates a clip named after your destination scene
- When that clip plays, the scene selection automatically jumps to your chosen scene
Practical Example: Imagine you have scenes named “First Song”, “Second Song”, “Another Song”, “Encore”, and “Encore 2”. Maybe you want “First Song” to jump directly to “Another Song” instead of progressing to “Second Song”. Simply select the clip slot in “First Song”, choose “Another Song” from the menu, and create the clip. Now when “First Song” plays, the selection automatically jumps to “Another Song”, ready for you to trigger it with your MIDI controller.
This device is essential for setlists that change between performances, songs with multiple possible endings, or any situation where you need quick access to non-adjacent scenes. The scene names clearly indicate where each clip will take you, making your set easy to read and modify on the fly.
Check out the full video tutorial below.
How to Trigger Next Scene – Always Play the Scene After the Last One Played
The Trigger Next Scene device solves a critical performance problem: it ensures you always trigger the scene that comes after the last scene that was playing, not the currently selected scene. This is especially powerful when combined with Scene Follow Actions.
The Problem It Solves: When you use Follow Actions to automatically play through scenes 1-4, and scene 4 finishes, pressing your “play current scene” button would trigger whatever scene is currently selected (often scene 1 or 2), not scene 5. This device tracks which scene played last and ensures your trigger button always plays the next logical scene in your sequence.
How to use Trigger Next Scene in Ableton Live:
- Add the device to a MIDI track
- Create a MIDI clip on every scene on this track (the device detects which MIDI clip played last)
- Use the device’s trigger button (which can be MIDI mapped or key mapped) instead of the standard “play selected scene” function
- The device will always play the next scene after the last one that was playing
This device is perfect for performers who use Follow Actions for automatic playback but need precise control over when to trigger the next section manually.
Again watch the full video tutorial to find out more.
How to set up Flexible Scene Selection in Ableton – Jump to Specific Scenes Automatically
The Flexible Scene Selection device gives you granular control over exactly which scene should be selected when any scene is triggered. Instead of always going to the next scene, you can program specific behaviors for each scene in your set.
What makes this device special: While Follow Actions and the other devices handle forward progression, this device lets you create custom scene selection behaviors. You can choose to:
- Jump to the next scene
- Return to the former (previous) scene
- Stay on the same scene
- Jump to any specific scene by name
How to use Flexible Scene Selection in Ableton Live:
- Add the device to a MIDI track
- For each scene, select the clip slot where you want to set up selection behavior
- Use the device menu to choose your desired action (next, former, same, or select a specific scene name)
- Click “Create Clip” to generate a clip with the embedded instruction
- The clip name will reflect the action (e.g., “next”, “former”, “Another Song”)
Once more check out the full video tutorial to learn more.
Advanced Use Case – Jump to Specific Scenes in Ableton
This device becomes incredibly powerful when you want non-linear scene progression. For example:
- You have scenes named “First Song”, “Second Song”, “Another Song”, “Encore”, “Encore 2”
- Maybe you don’t want First Song to progress to Second Song – you want it to jump to “Another Song”
- Select the clip slot in “First Song”, choose “Another Song” from the device menu, and create the clip
- Now when “First Song” plays, the selection automatically jumps to “Another Song”
- You can then trigger “Another Song” with your MIDI controller without manually clicking
The device refreshes its scene list to read all your scene names, making it easy to set up complex routing between different sections of your performance. This is perfect for handling encores, alternate song orders, or live looping scenarios where you need to stay on the same scene.
Why You Need Both Auto-Cue and The Scene Selection Navigation Pack
The free Auto-Cue device and the three devices in the Scene Selection Navigation Pack work beautifully together to cover every performance scenario:
- Auto-Cue (Free) ensures basic automatic progression through your scenes with simple, reliable next-scene selection
- Select Scene by Name lets you jump to any specific scene for non-linear setlists
- Trigger Next Scene gives you reliable manual control that respects Follow Action sequences
- Flexible Scene Selection provides next/former/same commands for quick scene navigation
All devices are Max for Live devices that work in Ableton Live 10, 11, and 12. You will need Max for Live, which is included in Ableton Live Suite or can be purchased as an add-on for Ableton Live Standard.
Start with the free Auto-Cue device for basic needs, then add the Scene Selection Navigation Pack when you need professional-level control for complex performances, non-linear song arrangements, or flexible live looping scenarios. Together, these tools ensure you’ll never miss a scene change or fumble with manual selection during a performance.ns, this pack ensures you’ll never miss a scene change or fumble with manual selection during a performance.
Related Max for Live devices for performing in Ableton Live Session View:


