Controlling Ableton Live via the SPD-SX (Get yours here!) *affiliate link* can be expanded with some Max for Live plug-ins. You can make use of the “Audio Effect” buttons of your Roland SPD to control starting new songs, scenes, tempo tap and much more. Some parameters which are not accessible via the normal MIDI MAP function in Ableton Live are included as well. This way can select tracks, arm and solo tracks.
Max for Live is an extension of Ableton Live which is included in the Ableton Live Suite version. If you have the Suit version, you don’t need to install anything to use those plug-ins. You can just simply drag and drop those devices into Ableton Live and start using them. Have a look on the Max for Live devices below.
If you are new to this whole topic:
Please have a look on my online course on using the Roland SPD-SX with Ableton Live!
Here you can find out how to set up a metronome click track with Ableton Live and the SPD-SX.
SPD-SX Kit Selector (V3)
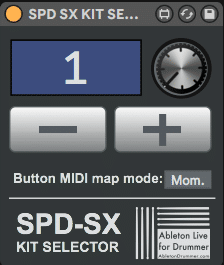
This Max for Live device lets you switch kit presets on your SPD-SX via Ableton Live. This device can be setup to listen to kit changes made on the SPD-SX itself, so you can still use your physical +/- buttons on the hardware.
This device becomes handy if you are playing sounds/samples from your SPD-SX but you want to set up automatic changes of those. One practical example: You are using Ableton Live for play-alongs/multi tracks/backing tracks – as soon as you select and play a song in Ableton Live the kit with the sounds on your SPD-SX for this song can be selected.
SPD-SX Master Effects Buttons to MIDI REMOTE
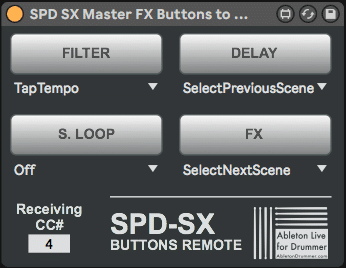
This device lets you use the 4 Master FX buttons of your SPD-SX to control actions in Ableton Live. This makes sense if you are using the SPD-SX as a MIDI controller for Ableton Live. E.g. you can navigate with those buttons between scenes or locators, meaning you can switch between songs or sections easily.
SPD-SX Control Master Effects
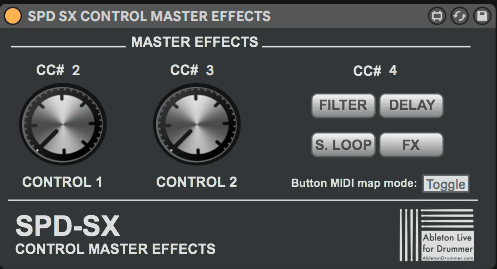
You can use this device to control the inbuilt sound effects of your SPD-SX from within Ableton Live. This could mean you are using sounds/samples hosted on your SPD-SX or using the SPD-SX as an external sound card and running the audio output from Ableton Live via your SPD-SX. You can automate changes of those audio effects via Ableton Live.
CHECK OUT FULL ONLINE COURSE ON SPD-SX WITH ABLETON LIVE
General set-up
You will need to make a few changes in your SPD-SX system menu to be able to use those Max for Live devices.
Please go into the MENU of your SPD-SX
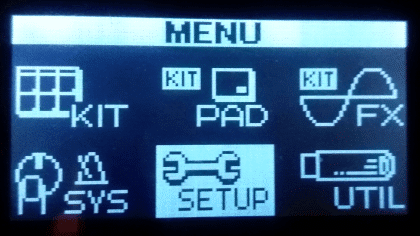
Then select SETUP
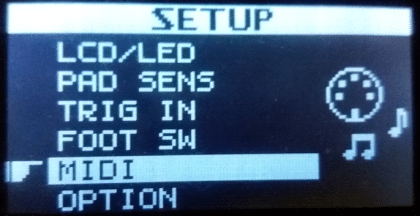
Then select MIDI
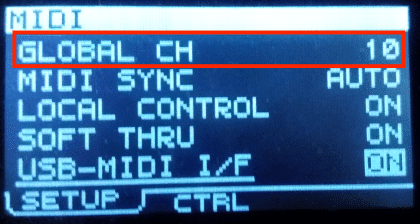
On the first page of the MIDI page here, only the GLOBAL CH parameter is interesting for us. It is ser per default to channel 10. Please check if that is the case on your unit and if not please set this to 10.
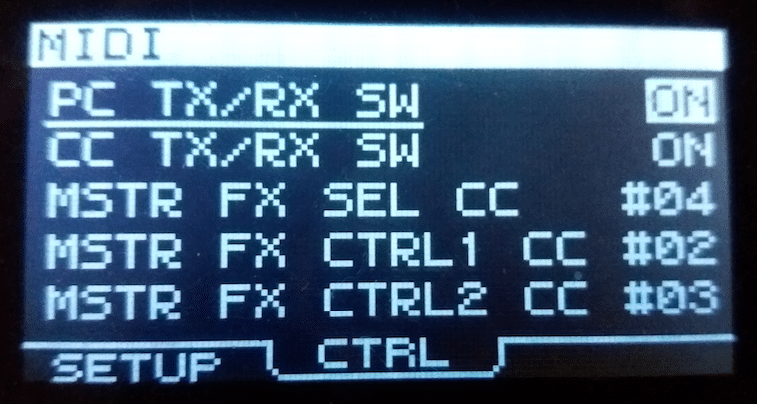
On the second page “CTRL” you have to switch on that the SPD-SX will send and receive Program Changes, MIDI CC and you need to define on which CC# (CC numbers) the Master FX wheels and buttons will send and receive values. Please set all your settings as they are on this picture. You could choose different CC# but you would then need to change a few settings in the Max for Live devices. So for keeping things easy please set all parameters like they are in the picture.
You now need to establish a MIDI connection between your computer/Mac and your SPD-SX. This could be achieved via your USB or via a 5-Pin MIDI connection e.g. plus an external sound card with MIDI I/O.
You will need to make sure that the right MIDI In and Out ports are being switched on in your Ableton Live Preferences.
If you are using a USB MIDI connection your MIDI prefs should look like this:
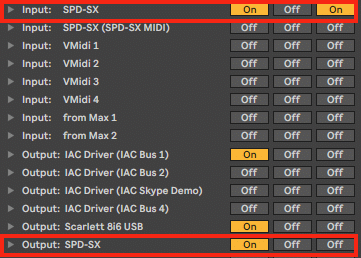
If you haven’t set this up before: it is all explained in my SPD-SX with Ableton Live online course, which will show you all possible connections and concepts of using the SPD-SX with ableton Live. You will find this course here https://blog.abletondrummer.com/roland-spd-sx-with-ableton-live-online-course/
SPD SX Kit Selector V3
As written before you can change the kits on your SPD-SX via Ableton Live with this device.
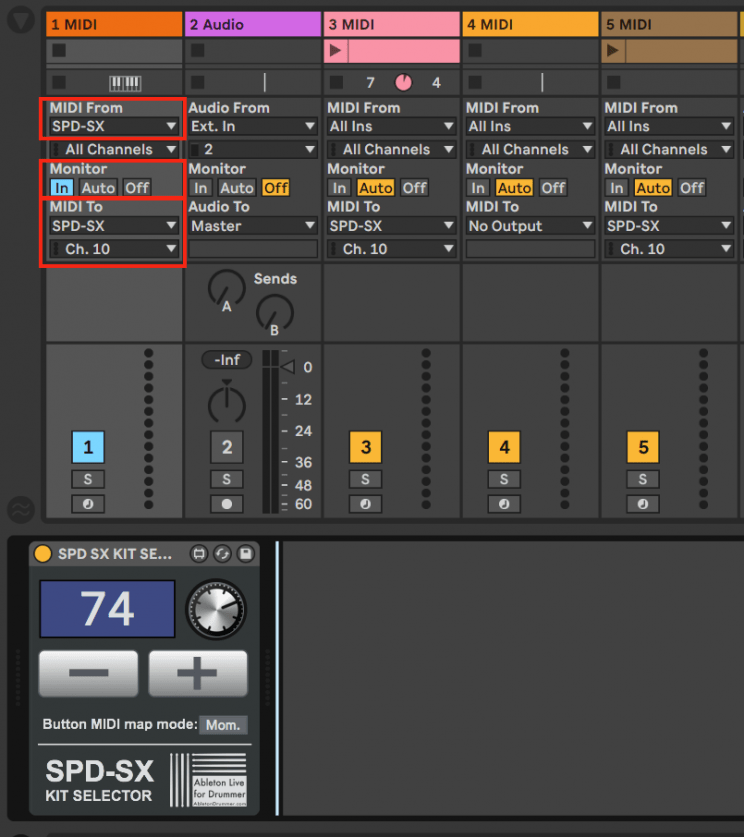
You just need to place the device on a MIDI track in Ableton Live and set the MIDI From and MIDI To on this track to “SPD-SX” and “Channel 10”. Set the Monitor to “IN”, this way you make sure that the MIDI signals all always being routed from and to your SPD-SX.
You are now able to control kit changes via clicking in the +/- or by moving the wheel on the device.
You can as well now automate kit changes via dummy clips in Ableton Live.
Toggle and Momentary Switch Mode
If you want to control kit UP and DOWN changes via other MIDI controllers/electronic drum pads (or computer keys) you can do that easily by going into Abletons Live MIDI MAP MODE SWITCH and assign those.
Some electronic drum pads and MIDI controllers are only able to send MIDI NOTE messages. Ableton only reacts to NOTE ON messages in MIDI MAP MODE. So in this case you would need to hit your pad twice to switch one kit UP or DOWN. As this is not ideal I added a mode which will solve this issue.
If you are using computer keys/MIDI notes mapped to the -/+ buttons set the mode to “Mom.” (=Momentary)
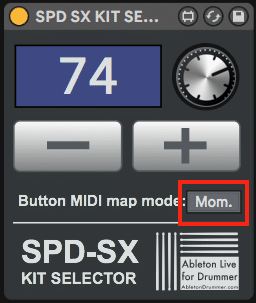
If you are using an external controller with MIDI CC to change the -/+ buttons you might be sending ON/OFF signals already and this might lead to the device jumping up/down 2 kits by just pressing the button on your MIDI controller once. In this case set this mode to “Toggle”.
SPD-SX Master Effects Buttons to MIDI REMOTE Ableton Live
Put the device on a MIDI track and set the MIDI From to “SPD SX” This way the MIDI CC generated by the Master FX Buttons is being received.
Make sure the CC# is set to the right number you have chosen in your MIDI CTRL section of your SPD-SX. (In the GENERAL SET-UP SECTION in this manual I showed you to set this to “CC# 4”. The parameter here is called “MSTR FX SEL CC”.
You can now choose an action for each of the four buttons, which will be triggered once pressed.
Below each button you will find a menu from which you can choose those actions:
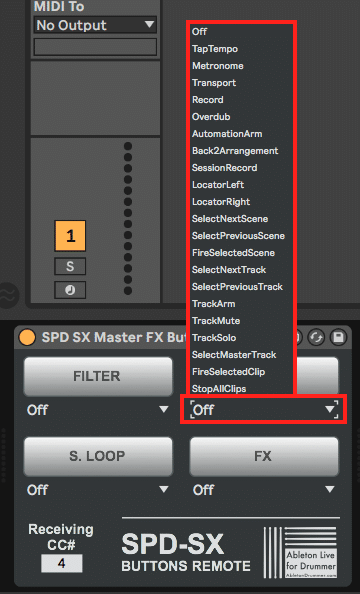
Menu functions
-TapTempo – tap the tempo
–Metronome – ON/OFF
-Transport – ON/OFF
-Record – ON/OFF
-Overdub – ON/OFF
-AutomationArm – ON/OFF
-Back2Arrangement
-SessionRecord – ON/OFF
-LocatorLeft – move to next locator left
-LocatorRight – move to next locator right
-SelectNextScene – move to next scene
-SelectPreviousScene – move to previous scene
-FireSelectedScene – play selected scene
-SelectNextTrack – selected next track right
-SelectPreviousTrack – selected next track left
-TrackArm – ON/OFF for currently select
-TrackMute – ON/OFF for currently selec
-TrackSolo – ON/OFF for currently selec
-SelectMasterTrack
-FireSelectedClip
-StopAllClips
Create and switch between multiple devices and/or automate the selection of actions
More then one action
You can have multiple devices of this M4L device running at the same time to fire more then one action with only one or several knobs. One Example here could be to add “FireSelectedScene” (start the selected scene) action to the actions of selecting scenes (“SelectPreviousScene”/”SelectNextScene”).
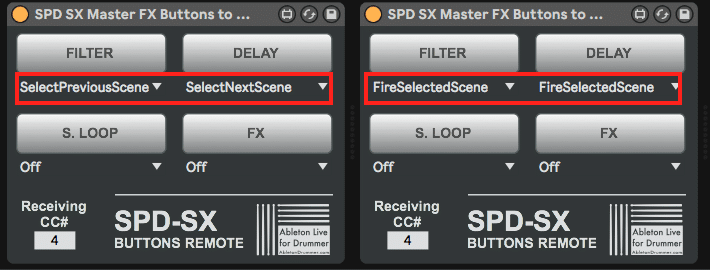
Different presets
You could have several devices with different actions selected sitting on the same track/in one Ableton Live set.
You would then turn ON/OFF the devices which preset you want to use. This could become handy if you would play a long set which would need different actions for different parts. You can always automate switching devices ON/OFF for the right section or use different chains in MIDI effect racks, which then could be selected.

Automate selection of changes
You can as well automate or select changes of the action menu via envelopes or external MIDI remote.
If you are using MIDI dummy clips, this would happen via the envelope section in the clip view.
You get access to all 4 menus of each button and automate changes here.

SPD-SX Control Master Effects
As written before this device can be used to control the Audio FX of your SPD-SX. This would mean the sounds/samples which are either hosted on your SPD-SX or the Audio Out from Ableton Live if you run that via the SPD-SX as an external sound card.
When using the audio from Ableton Live for this, I needed to switch the AUDIO IN to MASTER (meaning Master + Phones then selected) to get the effects applied on the audio coming in.
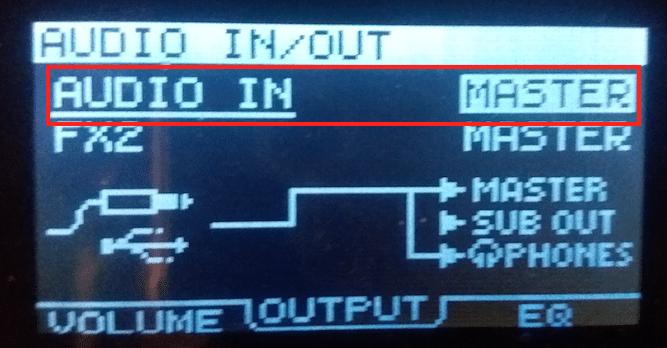
You will find this under: MENU – SYS – AUDIO IN/OUT
MIDI settings for MIDI CC in Ableton Live

You need to place the device on a MIDI track. You will need to make sure that the “MIDI To” section is set to “SPD SX” and to the right MIDI channel. (No.10 is the default preset of your SPD-SX).
Please make sure that the CC# are set to the right numbers in your SPD-SX CNTL section as well as on the device. (please refer to the general set-up section of this manual).
Use your mouse to change the parameters on the Max for Live device or you could KEY or MIDI MAP another external MIDI controller to the device parameters and then control the Audio FX section of your SPD SX.
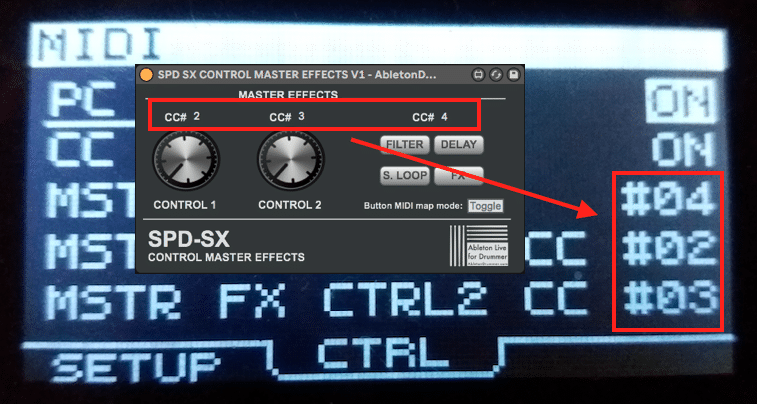
You can actually use the SPD-SX pads to control those parameters (e.g. switching effects On/Off). You just need to MIDI MAP those pads (MIDI notes) via Ableton Live on the M4L device parameters. For this purpose you need to make sure to have the “MIDI IN REMOTE” for the SPD-SX being switched to ON in Ableton Lives MIDI preferences.
When using external MIDI controllers to switch the effect buttons On/Off you can set the behaviour of those buttons to toggle or momentary. Ableton Live only reacts to MIDI ON messages in MIDI map mode this means the effect buttons of the M4L device are staying pressed after one hit and need to be released with another hit. When set to momentary (“Mom.”) the buttons will release automatically.
Automating the Audio Effects
Another interesting option which is possible through this device here would be to automate sound changes/the MASTER EFFECTS section of your SPD-SX via envelopes and automations in Ableton Live.

For more Audio FX which can be selected in your SPD-SX please check the SPD-SX “Effect Guide” HERE!
If you are interested in finding out more concepts and ways to use your SPD-SX with Ableton Live, you could CHECK MY FULL ONLINE VIDEO COURSE HERE!


