
Quantizing MIDI in Ableton is a powerful technique to ensure your playing alligns perfectly or close to perfect with the grid. This guide will show you how to automatically quantize selected MIDI notes in Ableton Live using Max for Live devices. Learn how to set individual quantizing parameters, adjust beats to the grid, and make your MIDI recordings tighter and more precise.

Individual Quantizing for MIDI in Ableton via Max for Live
To start, you’ll need Max for Live, which is included in Ableton Live Suite or available as an add-on for Ableton Live Standard. Max for Live allows you to use devices that offer advanced MIDI processing capabilities. This device here is designed to automatically quantize only the selected MIDI notes after recording in a MIDI clip in Ableton’s Session View.
How to Set Individual Quantizing for MIDI Notes When Recording
Here’s a step-by-step guide on how to set individual quantizing for MIDI notes in Ableton when recording:
- Load the Device: First, load the Max for Live device into your MIDI track. This device will enable automatic quantization for selected notes.
- Select the Notes: Choose the MIDI notes you want to quantize. For example, you might want to quantize only the kick drum and leave the hi-hats and snares more loosely played.
- Set Quantize Parameters: Adjust the quantize parameters for each note. You can specify the quantize amount (e.g., 50%, 100%) and the note value (e.g., quarter notes, eighth notes).
- Record Your Beat: Start recording your beat and recording MIDI notes.
- Automatic-Quantizisation will be applied when you re-trigger the clip you just recorded. Only the selected MIDI notes will be quantized according to your settings.
How to Adjust Beats to the Grid in Ableton
Aligning your beats to the grid can make your track sound more professional and polished. Here’s how to adjust beats to the grid in Ableton:
- Open the MIDI Clip: Double-click the MIDI clip you want to adjust. This opens the MIDI editor.
- Select Notes: Highlight the notes you want to quantize.
- Quantize Settings: Use the shortcut (Cmd + U on Mac, Ctrl + U on Windows). A dialog box will appear where you can set the quantize parameters (Up to Ableton Live 11). In Ableton Live 12 the quantising settings and function is to be found under the MIDI Transformation Tools. You can open this view via the same short-cut or selecting “Quantize” inside the “Transformation Tools” view.
- Apply Quantize: Choose the note value (e.g., 1/8, 1/16) and the amount (e.g., 100% for full quantization). Click OK to apply.
Below you find a picture of the MIDI Transformation Tools for quantising in Ableton Live 12
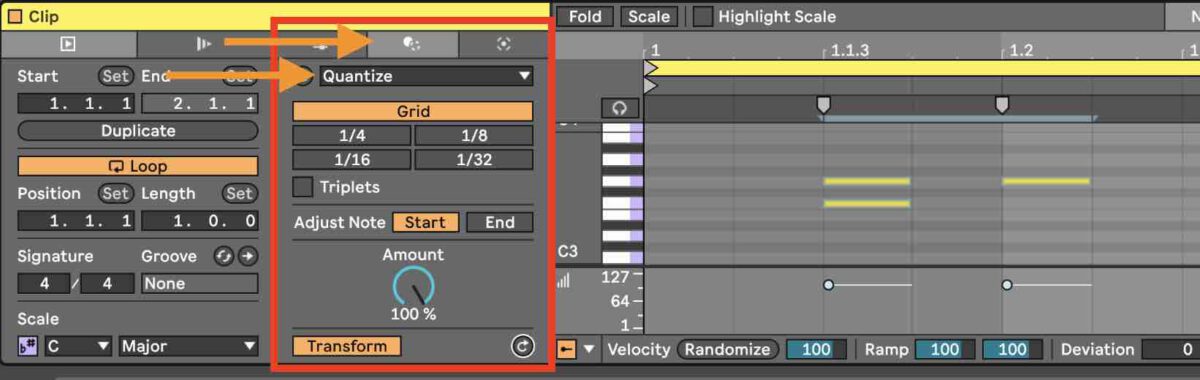
Setting Custom Parameters and quantizing specific MIDI Notes in Ableton Live 12
To fine-tune your MIDI recordings, set custom quantize parameters. This allows you to maintain some human feel while tightening up your performance.
- Quantize Menu: Open the Quantize Settings menu by right-clicking in the MIDI editor and selecting Quantize Settings.
- Adjust Parameters: Set the amount of quantization. For example, 50% quantization keeps half of your original timing and shifts the rest to the grid.
- Apply to Selected Notes: Apply these settings to only the notes you have selected.
- Activate “Transform” to set and hear the amount of quantisation in real-time while changing.
You might not always want to quantize all MIDI notes in a clip in Ableton. Sometimes, specific notes need precise timing while others benefit from a more natural feel.
- Select Specific Notes: Click and drag to select the specific notes you want to quantize.
- Set Quantize Value: Choose a quantize value suitable for the selected notes. For instance, quantize kick drums to quarter notes and hi-hats to eighth notes.
- Apply Quantization: Use the Quantize function to apply the chosen settings only to the selected notes.
Check out the Video below to learn more about quantizing only selected midi pitch in Ableton Live.
By following these steps, you can ensure your MIDI performances are tight and professional, enhancing your music production and live performance workflow. Whether you need full quantization or just a touch to tighten your performance, these three Max for live devices offers the flexibility and control you need to make your tracks shine. Quantizing MIDI in Ableton per selected pitch can become fairly easy with the presented tools.


