
As a music producer, coming up with fresh and interesting drum patterns is crucial for creating great tracks. However, spending hours manually creating drum loops can be time-consuming and take away from other aspects of your production. The Trap PATTERNATOR Max for Live devices can help streamline your workflow by quickly generating dynamic drum patterns for your tracks. This post covers and explains all functions on how to make trap beat in Ableton Live step by step. You will find a quick-start guide on “How to create a DNB Drum Loop in Ableton” here.

How to generate drum patterns in Ableton Live automatically
Just place the Trap PATTERNATOR on an empty MIDI track in Ableton Live. It will instantly create MIDI notes and play patterns when Ableton Lives transport plays. You can now place a Drum Rack preset (or with your own sounds) directly after it to trigger the sounds on the same track. The PATTERNATOR Trap Beat generator will instantly trigger the ‘right’ notes and sounds like Kick and Snare for Ableton Live Drum Rack presets. Some sounds like the “Snare Rolls” section will need custom editing of sounds and MIDI notes pitches.

How to route MIDI to record generated drum beats in Ableton Live
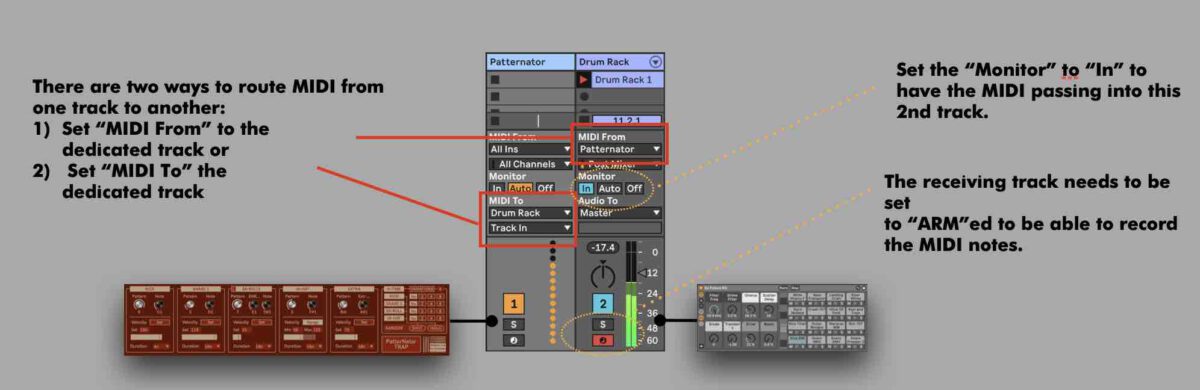
You can as well place a Drum Rack on a second MIDI track and route the MIDI from the PATTERNATOR track into the Drum Rack track. Using a second MIDI track for a Drum Rack (and the sounds) comes with one advantage. You are able to record the MIDI note patterns into a MIDI clip. This way you are able to re-call and edit certain beats. There are two ways to route MIDI from one track to another:
- Set “MIDI From” to the dedicated track or
- Set “MIDI To” the dedicated track
How to change drum patterns and note pitch in Ableton Live
The PATTERNator consists of 4 main drum pads dials which have 10 different rhythm-patterns to select from. The TRAP Patternator has an additional “EXTRA” pattern. You can find a detailed explanation further down in this article.
Those patterns are reflecting typical rhythms used in the dedicated genre. You can select those via the single “Pattern” dial. If turned all the way down no pattern will be played and the value will display “Off”.
Each drum pad/drum dial will ‘play’ one MIDI note pitch. You can change the pitch via the “Note” dial. Both dials can be accessed via mouse, external MIDI controllers and automations. When using a MIDI Remote scripts e.g. when using an Ableton Push there will be controls already set up for the dial encoders.
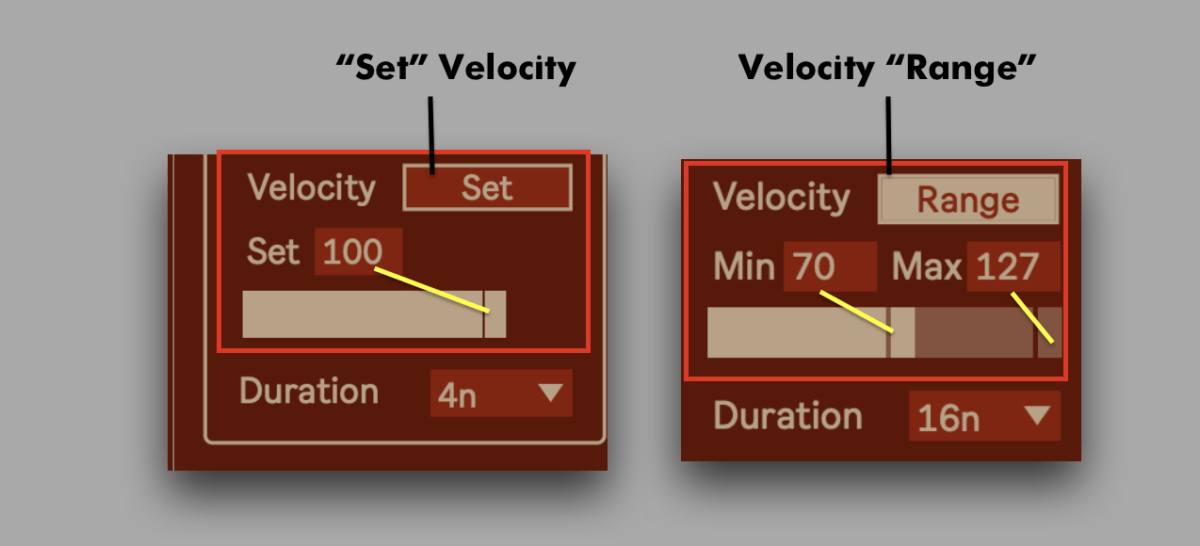
How to change the velocity for automated drum patterns in Ableton Live
Via the “Velocity” section you can set and edit the velocity modes:
- “Set” will fix the velocity to one set value. You can change this value via a number box and a slider.
- “Range” will create random velocity values within a defined range.You can set the min + max values for this range via the number boxes. The sliders below will visualise the selected range.
How to change the duration of generated MIDI notes in Ableton Live
The duration can be set to note values which will be relative to Ableton Lives set main tempo. Most drum samples wil play through and use “OneShot” mode. This way change in duration won’t change the length of most drum samples played. The note length feature is interesting for tonal sounds e.g. you can change the length of an 808 Bass Sub sound.
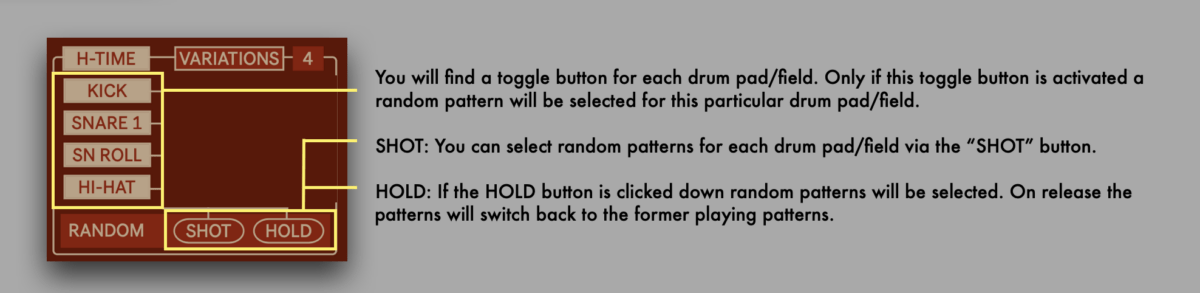
How to add randomisation to trap beats in Ableton Live
You will find a toggle button for each drum pad/field.You can activate a toggle button to apply random pattern selection. There are two methods for randomisation:
- SHOT: select random patterns for each drum pad/field via the “SHOT” button.
- HOLD: press the HOLD button to select a random pattern. On release the pattern selection will switch back to the former playing.
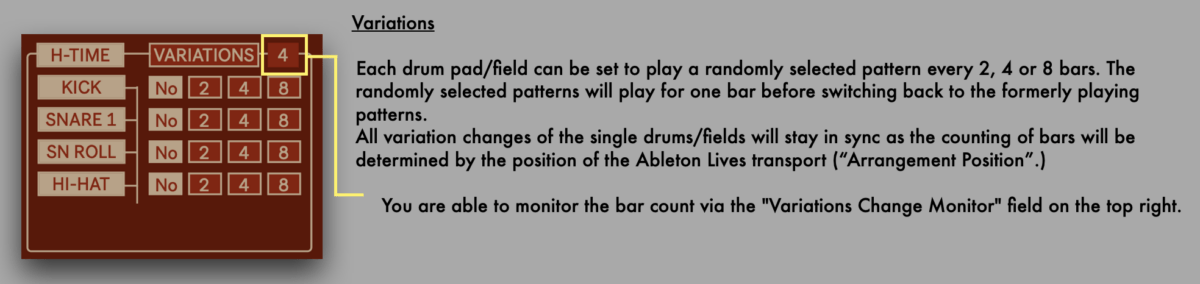
How to add variations to trap beats in Ableton Live
Each drum pad/drum dial can play a randomly selected pattern every 2, 4 or 8 bars. The randomly selected patterns will play for one bar before switching back to the formerly playing pattern. All variation changes of the single drums will stay in sync. Ableton Live’s global transport bar count sets the the bar number.

Functions only included in the “TRAP Patternator” version
The TRAP beat generator has some special function included. That is due to the typical style and to generate some genre typical beats.
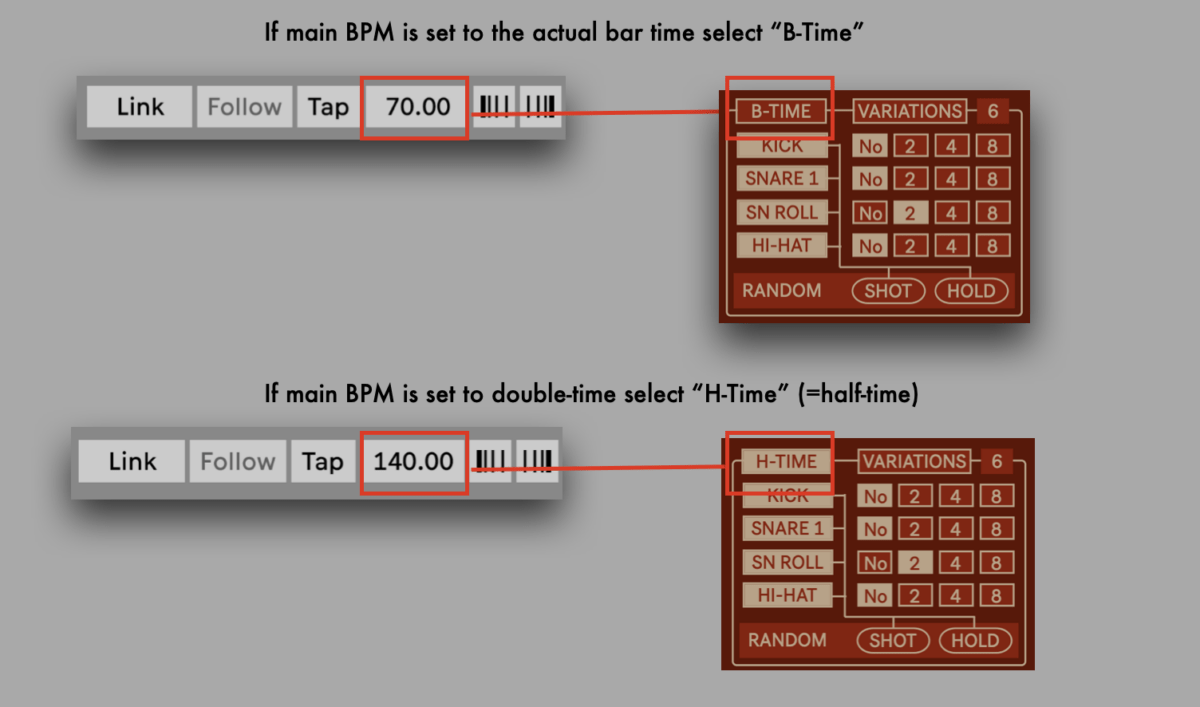
The drum patterns generated can be switched between “Full” (“Bar”) and “Half-Time”. Especially when producing Trap some people set the main BPM of Ableton Live to double speed (e.g. 140 BPM) instead of using the ‘real’ BPM (e.g. 70 BPM). The PATTERNator TRAP can be applied to play in half-time, if the main BPM is set to double time. This will be applied to the “Variations” section as well.
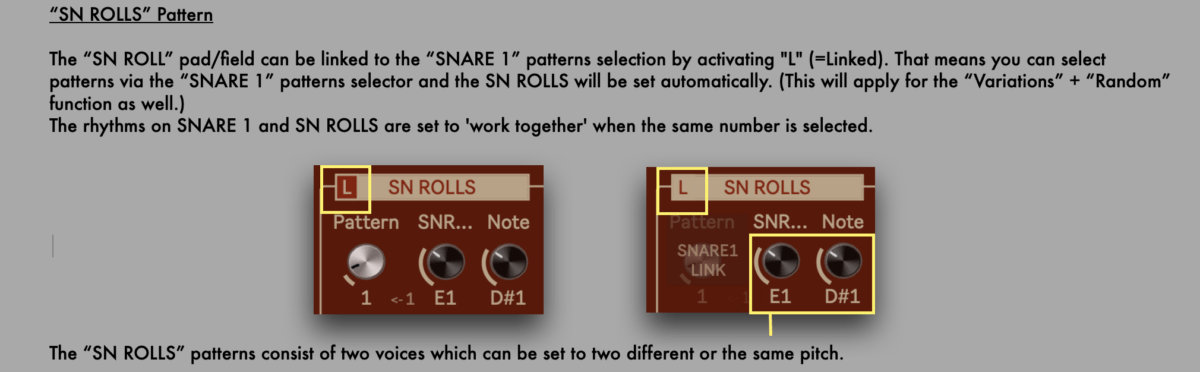
How to create “Snare ROLLS” for Trap beats in Ableton Live
The snare rolls “SN ROLL” pad/field can be linked to the “SNARE 1” patterns selection by activating “L” (=Linked). You can now select patterns via the “SNARE 1” patterns selector. The SN ROLLS will follow the “Snare 1” selection. This will apply for the “Variations” + “Random” function as well.
The rhythms on SNARE 1 and SN ROLLS will ‘work together’ and create ‘rhythmical sense’. The “SN ROLLS” patterns consists of two voices and notes pitch. You can set them to two different or the same pitches.
How to create Hi-Hat patterns for Trap beats in Ableton Live
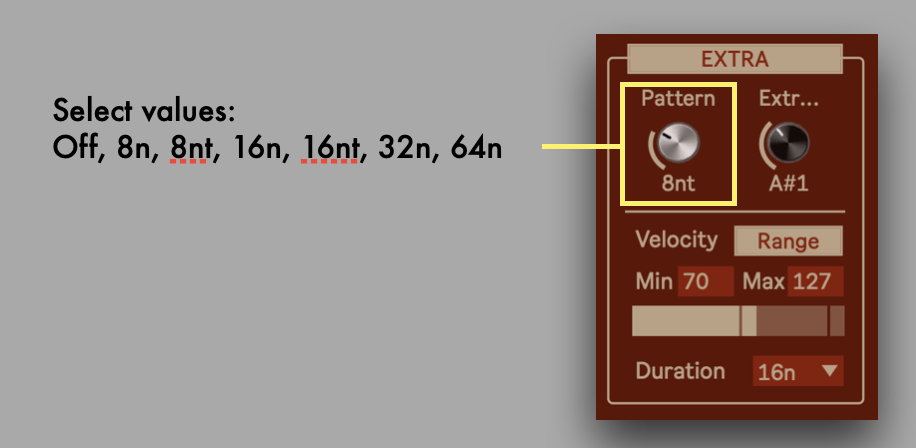
The “EXTRA” pad/field will play certain note values constantly through. The “Extra” will create (alternative) Hi-Hat patterns or other rhythmical dynamics when combing it with an on/off function.
Make sure to also check out the video tutorial on how to make a trap in Ableton Live below.
Take your beat production to the next level
The Trap Patternator M4L-device not only generates new drum patterns, but also allows for customization and editing. You can adjust the velocity, duration of drum hits and add your own variations when recording to a MIDI clip. This way, you can make a trap beat in Ableton Live and create unique drum loops that fits your track perfectly.


