
The Nektar Pacer (get yours here!)* with Ableton Live is a powerful combination that can transform your live music and live looping performances. In this guide, we’ll explore how to harness the full potential of the Nektar Pacer when integrated with the Nektar Pacer Foot Control Max for Live device.

Exploring MIDI Mapping with Nektar Pacer in Ableton
MIDI mapping is at the core of unlocking the Nektar Pacer’s potential within Ableton Live. It enables you to assign various functions in Ableton Live to the Pacer’s footswitches. The Pacer can be used for controlling live-looping performances and set-ups with Ableton Live as well. Unfortunately Ableton Live’s native MIDI mappings lacks of flexibility and customisation options. To enhance MIDI control you can get the Nektar Pacer Foot Control Max for Live plug in . You will need to set-up your Nektar Pacer to send MIDI notes. I created a preset which you can load directly on your Pacer via the 3rd party online editor. I explain every step for setting up your Nektar Pacer with Ableton Live in the video below.
Setting Up Your Nektar Pacer with Ableton Live
Let’s begin with the basics of setting up your Nektar Pacer with Ableton Live. This foundational step ensures a seamless connection between your hardware and software. Whether you’re using it for the first time or fine-tuning your setup, this section will guide you through the initial configuration.
Step 1: Physical Connection
Start by connecting your Nectar Pacer to your computer. You can do this via USB or a 5-pin MIDI connection. Ensure that your Pacer is powered on and recognized by your computer.
Step 2: Configure MIDI Ports
Now, let’s configure the MIDI ports in Ableton Live to recognize your Nectar Pacer.
- Open Ableton Live.
- Navigate to “Options” in the top menu and select “Preferences” (or press Ctrl + comma / Command + comma on Mac).
Step 3: Set Up MIDI Preferences for Nektar Pacer with Ableton Live
In the Ableton Live Preferences window, please select the “Link/Tempo/MIDI Section” and navigate to the bottom section called “MIDI Ports”
Under “In,” you should see your Nectar Pacer listed. Enable the “Track” option for your Pacer to ensure that MIDI messages sent from the Pacer are received by MIDI tracks in Ableton Live.
Step 4: Create a MIDI Track in Ableton Live
To control Ableton Live with the Nektar Pacer Foot Control PlugIn , you’ll need a MIDI track. Here’s how to create one:
- In the Ableton Live main window, locate the left panel with the browser and click on “Create” under “Categories.”
- Select “MIDI Track” from the list.
Step 5: Configure the MIDI Track
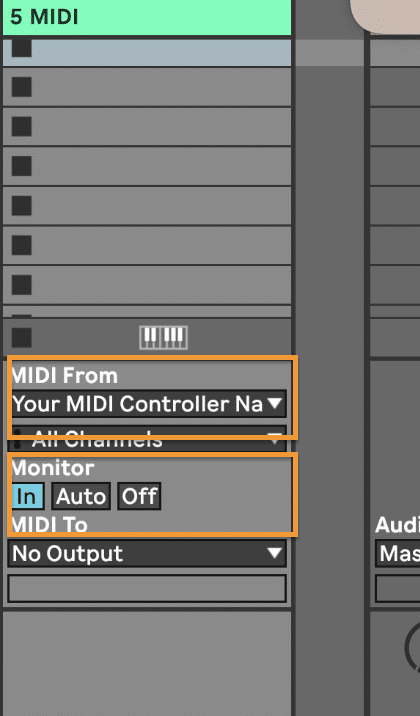
Now, you’ll need to configure the MIDI track to receive input from your Nectar Pacer.
Select the Nectar Pacer as the input source in the “MIDI From” dropdown menu. Set your “Monitor” to “In” to ensure MIDI messages will pass through this track all the time.
Step 5: Place the “Pacer Foot Control” on the track
Once you bought the Nektar Pacer Foot Control and installed it in your User Library you are able to use this in every Ableton Live Set. Just drag ‘n’ drop it onto the prepared MIDI track. Click on the “OPEN” button and check if your MIDI messages are being received by pressing the pedals. If the buttons move on the plugin you are now able to set up custom MIDI mappings.
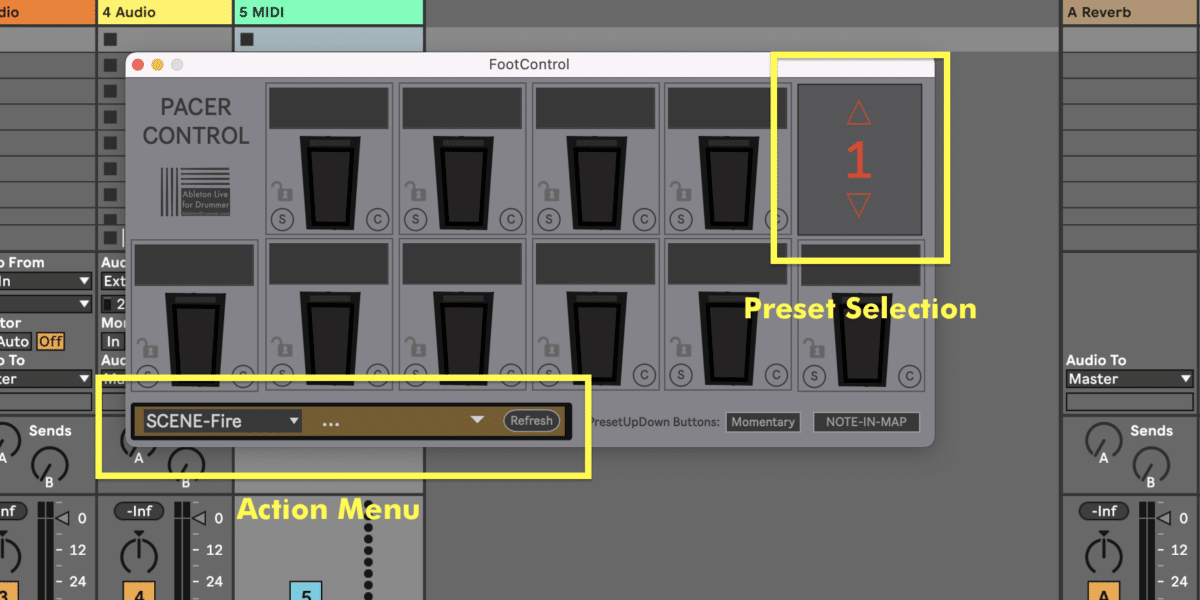
Creating Custom MIDI Mappings Presets
Select from the Action Menu the command you want to MAP. You can then assign the selected controls to a pedal slot via click on the “S” (Sync and Save) button on each slot. If you want to CLEAR one previously made mapping you can click on “C”.
You are able to move up / down and select presets for setting up different MIDI controls.
Global Control: Locking Functions Across Presets
Consistency is key in live performances. You can lock specific functions across presets, ensuring a uniform experience. Just click on the lock symbol in a slot to make apply the current selected control mapping for all presets.
Control and Automating Preset Changes for Nektar Pacer with Ableton Live
The Nektar Pacer with Ableton Live Foot Control Plugin simplifies preset changes during your performance. You can seamlessly switch between different setups, enhancing your flexibility on stage. You can set up footswitches to control Preset selection up and down. It is possible to set up automated preset changes via MIDI dummy clips in Ableton’s Session View or via automations in Ableton’ Arrangement View.
Conclusion: Elevate Your Live Performances with the “Pacer Foot Control” Max for Live device
In conclusion, the “Pacer Foot Control” plugin is a tool that can elevate your live music performances to new heights. By following this guide, you’ll unlock the full potential of pairing the Nektar Pacer with Ableton Live, create custom and dynamic MIDI mappings, explore the integration of the Max for Live device, and automate presets. With this set up at your disposal, you are able to customise control and focus on your live performances.
*affiliate link


