
How to use your MIDI velocity to control parameters in Ableton Live
Once a fellow ‘AbletonDrummer’ asked me if it would be possible to control delay, reverb and send knobs in Ableton Live with your drumming. Of course you can always midi map a midi drum/pad to a parameter in Ableton Live, but this would only work as an on/off switch or toggle, which wasn’t the idea. The idea was to control a parameter with your velocity, meaning if you would hit a pad with a high velocity an effect would be applied and e.g. the amount of the dry/wet parameter of a reverb would be dependent on the played velocity.
Velocity control in Ableton Live
I knew that there a some build in options for sound control over velocity, of course you have it in the Sampler Instrument, where you can apply different velocities to different samples.
Or you can use the velocity chain concept of Ableton Live in an Instrument Rack to define certain chains (of sounds, instruments or audio and midi effects) to define at which velocity a chain should be ‘played’ as well as using the midi effect ‘VELOCITY’ to gate certain chains or even tracks.
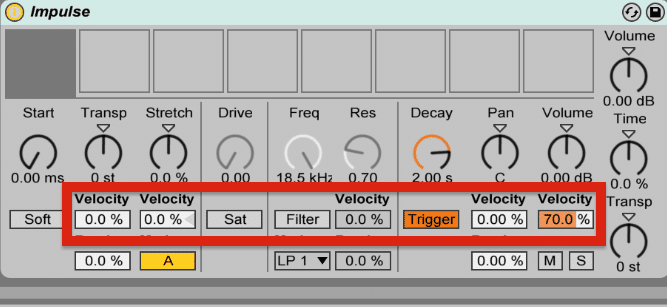
In the Sampler you will find some direct sound control you can apply to your playing velocity, pretty cool but limited to 2 assignments
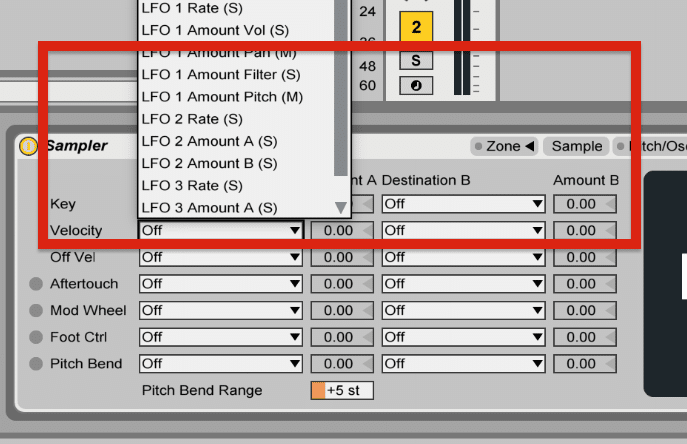
Velocity control (not only for drummers) is found in the Impulse, where you will get control over transpose, stretch, filter, pan and volume out of the box.
I got to say this really is the reason which still makes this quite basic (drum) sampler so powerful and interesting, not only but especially for AbletonDrummers.
BUT – this opportunities couldn’t solve the goal I was trying to archive, which was full midi control by velocity to every midi map able parameter plus using this to control 3rd party softwares for lightning/DMX or VJing, so I had to program something myself.
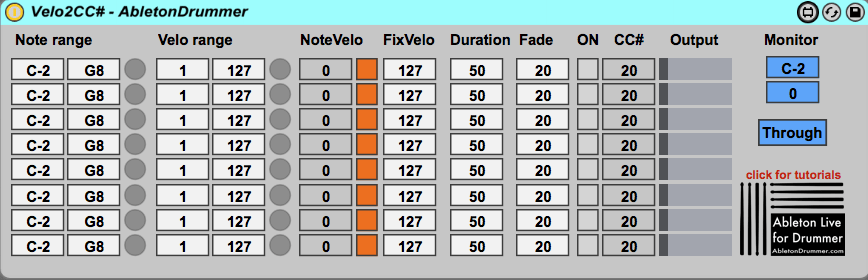
The Velo2MidiCC in Max for Live
I knew that my goal could be archived here and with the very kind support from Tim from Soundmanufacture I was able to patch the Velo2MidiCC – which is converting the velocity to a midi control change signal.
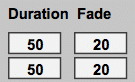
Duration and Fade
This device is not only converting the velocity to control change values, it lets you edit how long the note and the fade to zero in the control change will be, this is necessary e.g. if you want to midi control something like a delay, only switching/turning a delay effect on for the time of one short drum hit, will lead to a very, very short delay – which in most cases wouldn’t be noticed at all, in other words you just wouldn’t get a delay sound effect at all – so you could set the length to a longer time and edit how long the fade to the value ‘0’ should take place in milliseconds.
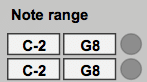
Note range
As you might want only certain e pads/midi notes triggering certain effects, you can define the note range to which the set up control should react to. A control light next to the note range fields will blink up, if you are sending note in in this range
Velocity range
Same with your velocity range. You could set controls only being triggered, if you are playing in a certain velocity range – this means e.g. you could set up a delay, which will be only triggered if you are playing in a velocity over e.g. 120. If you want to go deep sound control, you could even set up multiple velocity ranges for the same pad(s) – e.g. triggering a reverb from 1-50, triggering a delay from 20-120, triggering a grain delay from 120-127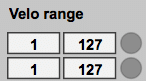
Note or fixed velocity
You have 2 options which velocity will be used for the CC signal being generated, you can use your playing velocity or a fixed velocity value.
So if you want apply a sound effect which should be dynamic to your playing velocity, e.g. a filter frequency which should change according your playing velocity, you want to switch on the NoteVelo(city).
If you want to have the same sound effect being applied e.g. a delay should be triggered always to a certain value, you can set a fixed velocity, so you will get always the same midi CC message value.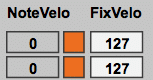
Further midi mapping control in Ableton Live
Of course as it is all midi mapping, you can edit minimum and maximum values in the mapping browser in Ableton Live to get the results you are looking for.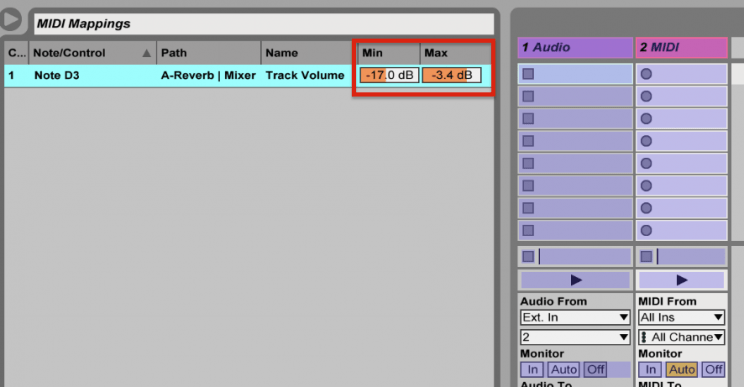
AND of course controlling third party software as well with my velocity is easy to set up because MidiCC can be routed virtually on your Mac or PC – so it easy to send those midi CC messages e.g. to a DMX lightning software or a VJ software.
This device will help you to create much deeper (live) sound control!