Introduction
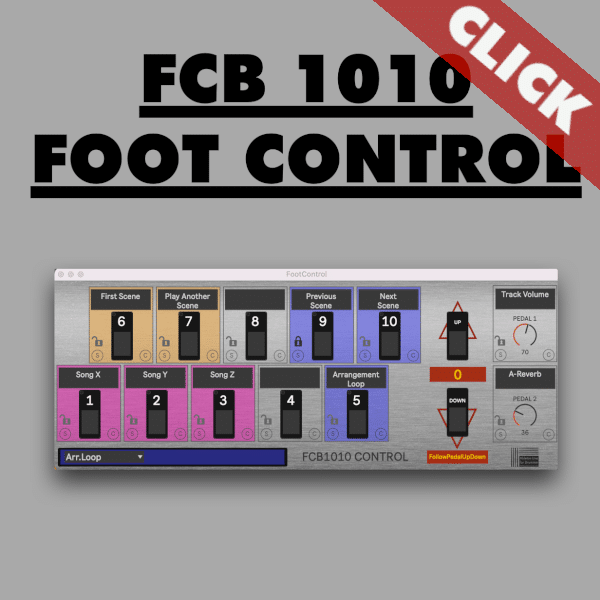
In this blog post I will guide you through on how to set up your Behringer FCB 1010 (get yours here!)* with Ableton Live. The FCB 1010 foot controller can seamlessly control multiple functions in Ableton Live via the FCB1010 DYNAMIC FOOT CONTROL Max for Live device . This setup is quick and easy, and by the end of this guide, you’ll have a solid understanding of how to make the most out of your FCB 1010 with Ableton Live. Please check out the full video run-through tutorial, which will provide you with more infos and tips and tricks.
Understanding the FCB 1010 MIDI
The FCB 1010 is a powerful foot controller with multiple pedals that can be customized to trigger various actions in Ableton Live – BUT the programming on the FCB 1010 itself is very complicated. To make multiple MIDI map presets and get their quick I highly advise to check out my Dynamic Foot Control plug in. It’s a versatile tool that can streamline your workflow and enhance your live performances. Let’s dive into the details of how to set it up.
Presets and Actions on FCB 1010 with Ableton Live
The FCB1010 DYNAMIC FOOT CONTROL allows you to create presets, each of which can be programmed to trigger specific actions in Ableton Live. You can think of presets as sets of commands that your foot controller will execute.
For example, in preset number zero, you can start the transport, toggle the metronome on/off, cycle through scenes, select markers, and more—all with the press of a foot pedal.
Flexibility of Presets
What’s remarkable about the FCB 1010 is that you can set up different presets for each pedal. Each preset can have its unique set of actions. For instance, when you switch from preset zero to preset one, the same pedal can trigger an entirely different command.
This flexibility allows you to adapt your FCB 1010 to various situations and tailor it to your specific needs.
Setting Up Your FCB 1010 with Ableton Live
Now, let’s go through the step-by-step process of setting up your FCB 1010 with Ableton Live. This guide may seem long, but it’s designed to provide you with a thorough understanding of the setup process.
Connecting Your FCB 1010 with Ableton Live
- MIDI Connection: Start by connecting your FCB 1010 to your computer using a MIDI cable. Most external sound cards have a 5 pin MIDI input on their external sound cards, so a standard MIDI cable should suffice.
- Ableton Live MIDI Preferences: Open Ableton Live and go to the Preferences menu. Under “Link Tempo MIDI,” activate the MIDI port to which your FCB 1010 is connected. It’s essential to ensure that the track in port is activated.
Preparing Ableton Live
- Adding a MIDI Track: Create a new MIDI track in Ableton Live. This track will receive MIDI input from your FCB 1010.
- Monitoring MIDI: You’ll see MIDI activity indicators when your FCB 1010 sends MIDI messages to Ableton Live. To allow these messages to pass through, set the monitor mode to “In.”
Configuring Your FCB 1010
- Setting Factory Defaults: Ensure your FCB 1010 is set to its factory defaults. To do this, power it off, then power it on while holding down pedals one and six. This will reset the FCB 1010 to its factory settings. This process is only needed if some MIDI commands on the FCB1010 were changed before.
- Max for Live Plugin: You would need to buy the FCB1010 DYNAMIC FOOT CONTROL Max for Live device. Max for Live devices will only work if you have the Ableton SUITE version or if you bought M4L as an add on for Ableton Live STANDARD.
Mapping Your FCB 1010
- MIDI Mapping: Now, you can start mapping your FCB 1010 to control various functions in Ableton Live. Here are some examples:
- Map a footswitch to control track volume.
- Map another footswitch to toggle the metronome on/off.
- Map a pedal to cycle through scenes.
- Map a different pedal to select markers.
- LOCK Mappings for all presets: Additionally, you can set up one MIDI mapping for one pedal to be present on all presets. Just click on the lock sign to do so.
- Foot Pedal Expressions Control: You can also map your foot pedal’s expression to control parameters like track volume or return send knobs.
- Saving Presets: You have the option to save presets for your FCB 1010. This is particularly useful if you want to reuse specific mappings in different Ableton Live sets. Unfortunately only GLOBAL control settings like metronome, transport on/off, next/previous Scene/Locator can be stored and recalled in different Ableton Live sets.
Follow Pedal Up and Down vs. Follow Automation
Follow Pedal Up + Down
The FCB1010 DYNAMIC FOOT CONTROL offers two modes of operation: Follow Pedal Up/Down and Follow Automation.
In Follow Pedal Up and Down mode, your FCB 1010 follows the preset selection on the foot controller itself. When you select a preset on the FCB 1010, it corresponds to the preset in your Max for Live plugin. This mode is great for quick preset changes and controlling preset changes via the FCB1010.
Follow Automation
Follow Automation mode, on the other hand, ignores the preset selection on the FCB 1010. Instead, it solely follows the automation selections within the Max for Live plugin. This mode can be useful when you want to automate preset changes. For example, you can set up automation envelopes to change presets automatically during your performance and pre-set which pedal should control what parameter.
Conclusion
In this comprehensive guide, we’ve explored how to set up the FCB1010 DYNAMIC FOOT CONTROL for your Behringer FCB 1010 foot controller to work seamlessly with Ableton Live. By understanding the different modes, mapping options, and automation possibilities, you can unlock the full potential of your FCB 1010 with Ableton Live and enhance your music production and live performances.
*affiliate link


