
Wouldn’t it be great to launch clip trigger in Ableton Live’s Session View via a MIDI controller with complete flexibility? This guide shows you how to set up dynamic MIDI control that overcomes the limitations of standard MIDI mapping. You’ll learn to launch clip trigger in Ableton for both specific clips and clip slots, giving you professional-level control for live performances.

What You Need to Launch Clip Trigger in Ableton
Before you launch clip trigger in Ableton with external MIDI control, gather these requirements:
- Max for Live (included in Live Suite or available as an add-on for Live Standard)
- The CLIP+CLIPSLOT MIDI Control Pack
- A MIDI controller that sends MIDI notes (pads, keys, or buttons)
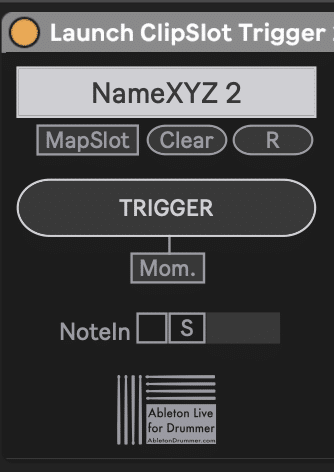
The CLIP+CLIPSLOT Trigger Pack includes 2 devices in three versions: Launch Clip Slot Trigger (1, 5, and 10 slot versions) and Launch Clip Trigger (1, 5, and 10 clip versions). These devices let you launch clips and clip slots in Ableton without the restrictions of Ableton’s native MIDI mapping.
How to Set Up Dynamic MIDI MAP for Clip Slots in Ableton Live
Standard Ableton MIDI mapping locks your controller buttons to specific functions permanently. However, the Launch Clip Slot Trigger devices let you create flexible, dynamic mappings that you can turn on and off as needed.
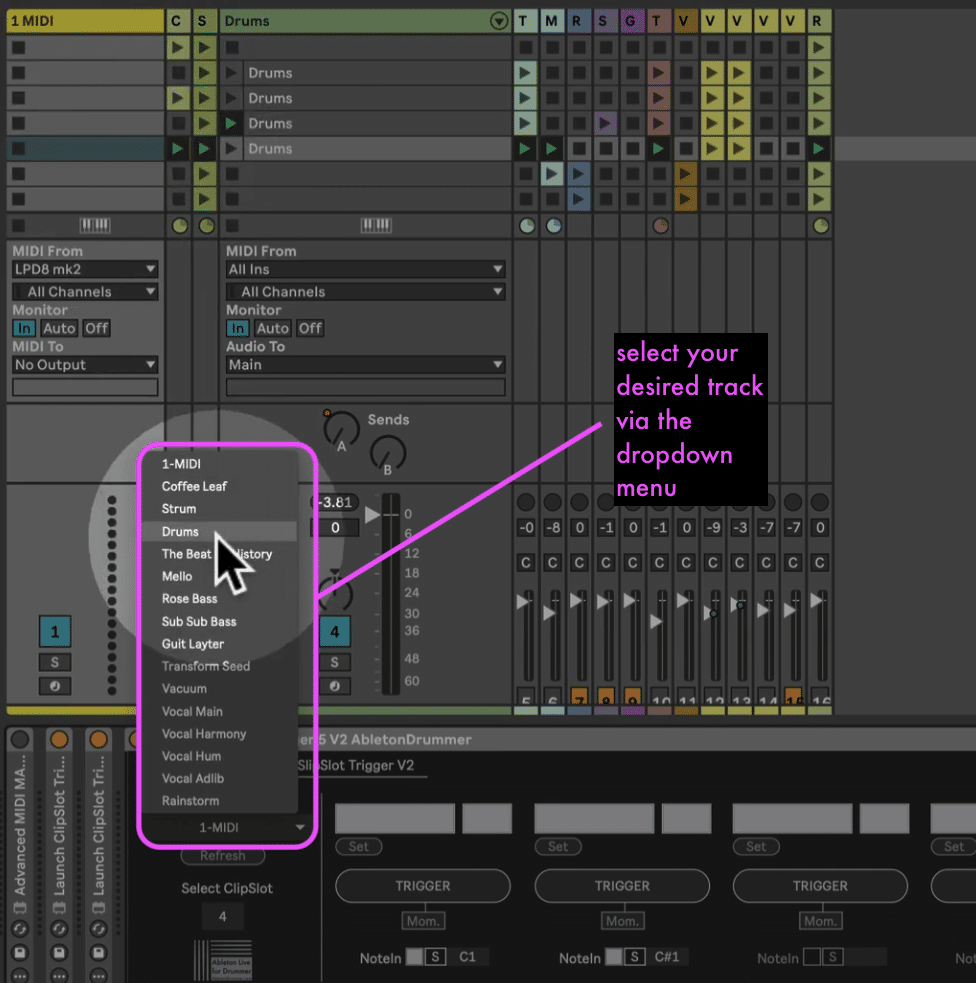
First, create a dedicated MIDI track for your MIDI controller and drop one of the Launch Clip Slot Trigger devices onto this track (choose the 1, 5, or 10 slot version depending on how many slots you want to control). Next, set your track’s Monitor to “In” so MIDI notes from your MIDI controller always passes through. If you don’t receive any MIDI notes already in this track: check if your MIDI controller’s Track input in Ableton’s MIDI preferences is activated.
How to Map MIDI Notes to Launch Clips in Ableton
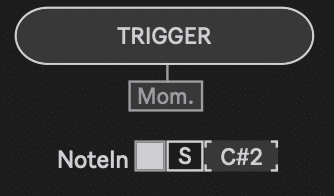
The Launch Clip Slot Trigger devices use intelligent MIDI note learning. Activate the toggle button on the device, then press “S” to enter learning mode. Hit any pad on your MIDI controller, and the device automatically detects the MIDI pitch.
Once the device learns your MIDI note, select your target track from the dropdown menu (click “Refresh” if you’ve added new tracks), enter the scene number you want to trigger, then hit “Set” to confirm. The device displays the track name and scene number. Press your mapped pad to launch clip trigger in Ableton for that specific clip slot immediately.

Step-by-Step Guide for Triggering CLIP SLOTS in Ableton Live
Follow this streamlined workflow to launch clip trigger in Ableton:
- Install the devices: Get the CLIP+CLIPSLOT Trigger Pack
- Create control track: Add a MIDI track dedicated to your trigger device
- Set monitor mode: Change Monitor to “In” for continuous MIDI pass-through
- Enable controller: Activate your MIDI controller in “MIDI From” menu
- Map MIDI notes: Press “S,” on the Max for Live device, hit your pad on your MIDI controller and the device auto-detects the pitch
- Select targets: Choose track and scene number
- Test immediately: Press your controller to launch clip trigger in Ableton

Dynamic MIDI Trigger Control for CLIPS in Ableton Live
Beyond triggering clip SLOTS, the Launch Clip Trigger devices let you launch CLIPS in Ableton for specific clips regardless of their position. This feature proves invaluable when you frequently rearrange clips.
Step-by-Step Guide for Dynamic CLIPS Triggering via MIDI controller in Ableton Live
Follow this streamlined workflow to launch clip trigger in Ableton:
- Install the devices: Get the CLIP+CLIPSLOT Trigger Pack
- Create control track: Add a MIDI track dedicated to your trigger device
- Set monitor mode: Change Monitor to “In” for continuous MIDI pass-through
- Enable controller: Activate your MIDI controller in “MIDI From” menu
- Map MIDI notes: Press “S,” on the Max for Live device, hit your pad on your MIDI controller and the device auto-detects the pitch
- Select targets: Choose track and scene number of the current position of the CLIP
- Test immediately: Press your controller to launch the clip in Ableton
Consequently, you can reorganize your Session View freely without breaking your MIDI mappings. The clips remain accessible from the same controller buttons regardless of where they sit in your set.
How to Overcome Ableton MIDI Map Limitations
Standard Ableton MIDI mapping creates permanent, exclusive bindings. When you map a MIDI note using native mapping, that note becomes locked to that single function. The key advantage when you launch clip trigger in Ableton Live using these devices comes from direct MIDI IN routing. Unlike native MIDI mapping, this approach preserves your MIDI notes for playing sounds while simultaneously triggering clips.
Benefits of Max for Live MIDI Mapping via Direct MIDI IN:
- Flexibility: Assign multiple actions to the same MIDI note and preserve the MIDI note for playing sounds
- Dynamic control: Change mappings by enabling/disabling M4L devices
- Automation: Turn devices on and off programmatically via pre-set automated (de-) activation of M4L devices
These advantages transform how you launch clip trigger in Ableton during live performances, where flexibility determines success.
How to Set Up Advanced MIDI Control in Ableton Live
For deeper, customised and flexible use for triggering functions in Ableton Live via a MIDI controller, AbletonDrummer developed the Advanced MIDI Control Buttons device.
The Advanced MIDI Control Buttons device lets you map buttons to launch scenes, trigger locators, control transport, toggle metronome and many other actions. Furthermore, it includes 128 preset slots, giving you context-sensitive control where one button launches different clips depending on which preset you’ve activated.
It can send MIDI notes to other devices as well and this is the way how it can be combined with the CLIP+CLIPSLOT Trigger Pack devices is shown and explained in the video below.
More M4L tools for customising Ableton Live with your MIDI controller
Another M4L solution for saving MIDI Mappings across Ableton Live set is the Global MIDI MAP Presets M4L device.
This device lets you set up midi mappings from your controller to macro dials of Ableton Racks. You are able to store those in your Ableton User Library and recall those in any Ableton Live set. This way your MIDI controller will instantly control the parameters in Ableton Live without having to set up any MIDI mappings again.


